


-50
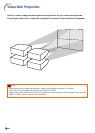
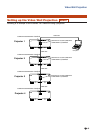
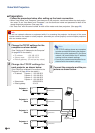
Video Wall Projection
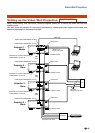
Projector 1:
Master
Projector 2:
Slave
Projector 3:
Slave
Projector 4:
Slave
LAN terminal
LAN terminal
LAN terminal
LAN terminal
LAN cable
LAN cable
(straight-through type)
Hub
Computer
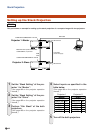
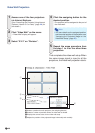
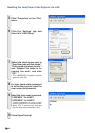
1 Change the TCP/IP settings for the
computer as shown below.
(See “Setting an IP Address for the Computer”
on page 22 for the details.)
• IP address : 192.168.150.2
• Subnet mask : 255.255.255.0
• Default gateway :
(Do not input any values.)
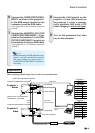
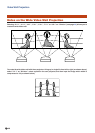
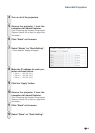
2 Change the TCP/IP settings for
each projector as shown below.
(See “Setting up a Network Connection for the
Projector” on page 24 for the details.)
•
IP address Projector 1 : 192.168.150.3
Projector 2 : 192.168.150.4
Projector 3 : 192.168.150.5
Projector 4 : 192.168.150.6
•
Subnet mask : 255.255.255.0
•
Default gateway : 0.0.0.0
Note
• The TCP/IP settings shown are examples
to make connections following the diagram.
• When using other equipment in the same
network, be careful about the IP address
overlap or other network settings.
• Consult your network administrator for as-
sistance with the network settings.
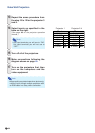
3 Connect the computer and the pro-
jectors as shown below.
■ Preparation
• Follow the procedure below after setting up the basic connection.
• When “User Name” and “Password” have been set to the projector, reset them before the stack projec-
tion setup. To set “User Name” and “Password”, use the same user name and password for both of the
master and slave projectors. (See page 28.)
• Set “Data Port” with the same number for both of the master and slave projectors. (See page 29.)
Info
• Do not use network software or equipment while it is accessing the projector via the port of the same
number used for the master or slave projector, otherwise you cannot properly control multiple projectors
with one remote control.