


ENGLISH
ENGLISH
– 1 –
QUICK SETUP GUIDE FOR THE SHURE UP WIRELESS SYSTEM
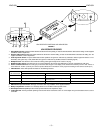
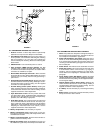
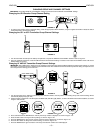
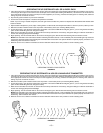
UP4 Receiver Setup and Camera Mounting
To audio input
To power supply
(If not using interior battery power)
FIGURE 1
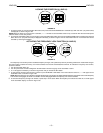
ATTACHING THE MOUNTING BOX, INSTALLING THE UP4 RECEIVER
1. Open the battery compartment on the UP4 receiver and insert a fresh 9 volt battery if battery power is to be used. Attach the two antennas to
the ANTENNA IN SMA connectors.
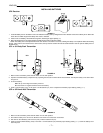
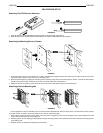
2. Attach the mounting box to the video camera (see Attaching the Mounting Box to a Camera).
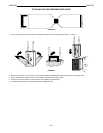
3. Insert the UP4 receiver into the mounted box. Connect the audio cable from the UP4 audio output into the audio input(s) of the video camera.
If not using the receiver’s battery, attach a cable from the receiver’s dc jack to the camera’s battery port. (See Installing the UP4 Receiver)
4. Set the Push-Lock Audio Gain Pot to the appropriate level for the camera sound input or other equipment you are using.
5. Move the receiver’s power switch to the ON position.
Note: If you encounter RF interference, change the Group and Channel setting on the transmitter and the receiver. Refer to the supplement for
additional frequency information.
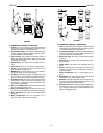
UC1/UC2/U1/U2 Transmitter Setup
1. Open the battery cover and insert a fresh 9V alkaline battery (UC1/UC2) or two 1.5V AA batteries (U1/U2)
2. Make sure the transmitter Group and Channel settings match those of the receiver. If they do not, adjust settings using either a screwdriver (UC1
and UC2) or the electronic controls (U1 and U2).
3. Close the battery cover.
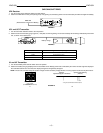
System Operation
1. Turn the transmitter on and speak into the microphone.
2. On the UP4 receiver, the PWR LED, RF LED and AUD LED should illuminate green, indicating that the receiver is receiving the transmitter signal.
3. If the AUD LED on the receiver glows red steadily when you are speaking in a normal voice, try adjusting the transmitter gain until the AUD LED
glows green on the receiver. The AUD LED should flash red when you speak loudly.