


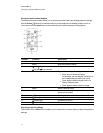


Adjusting the image
Refer to these notes when adjusting the projected image as described in the included installation
instructions for the SMARTBoard 480iv and 680iv interactive whiteboard system
(smarttech.com/kb/153153).
l Project a computer image set to the proper resolution while adjusting the image. If you don’t
have a computer, use the projector’s default background so that you can see the full projected
image clearly. If possible, use a pure white screen to allow for easier alignment.
l Use the mechanical adjustments described in the installation document to make image
adjustments instead of the projector’s on-screen menu options.
l Make sure the top of the projected image aligns with the top of the interactive whiteboard.
l Make sure the projector boom is centered on the mounting bracket. You can access the
mounting bracket by removing the mounting bracket cover.
l Don’t loosen the knob and locking screw too much or the projector won’t hold the adjustments.
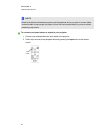
l As you tilt the projector up or lower its mounting boom to raise the image, the entire projected
image increases or decreases in size, especially at the bottom of the projected image.
l When adjusting keystone (tilt), ensure that the top and bottom edges of the image are
horizontal before you position the left and right edges of the image relative to your interactive
whiteboard.
l When you move the projector forward or backward on the boom to make the image larger or
smaller, you might need to tilt or turn the projector slightly to keep the image square.
l To fine-tune the image, you might need to repeat all steps described in the installation
document in smaller increments.
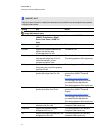
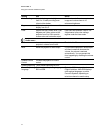
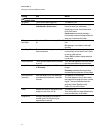
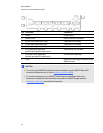
SMART V25 projector connection diagram
You can connect a variety of peripheral devices to your projector, including DVD/Blu-ray players,
VCRs, document cameras, digital cameras, high-definition sources and audio output.
N N OTE
You might need to purchase third-party adapters to connect certain peripheral devices.
C HA PTER 3
Usingyour interactive whiteboardsystem
19