


99-00668-00 REV B0 Preparing the Interactive Whiteboard for Use 23
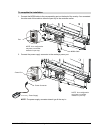
1. Connect a serial cable from the flat-panel display to an available serial port on your computer.
NOTE: You may already have connected the flat-panel display to the computer to activate the
On-Screen Display Control (page 21).
2. Open the Windows Control Panel for your computer.
3. Double-click the Display icon.
The Display Properties dialog box appears.
4. Press the Screen Saver tab.
5. Select SMART Bulb Saver from the list of screen savers.
6. Press the Settings button.
The SMART Bulb Saver dialog box appears.
If you previously installed an On-Screen Display Control for your flat-panel display, you’ll see
that the serial port has been selected and associated with the display, and the delay time has
been specified. Proceed to step 8.
7. If you haven’t configured the On-Screen Display Control, configure it now by pressing the
Display Control Panel button (see page 21).
8. To set the parameters for shutting down the computer and logging off the current user, press
the Shut Down tab and follow the on-screen instructions.
9. To specify a custom bitmap or company logo as the SMART Bulb Saver graphic, press the
Custom tab and browse to the graphic file you want to use.
10. Press the Apply button, and then press OK.
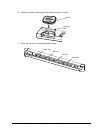
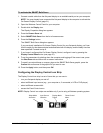
Configuring the Display Control Icon Strip
The Display Control icon strip is a set of icons that you can use to:
• turn your flat-panel display on and off
• select a different input source (e.g., your computer or, if connected, a VCR or DVD player)
• select a different screen width
• access the Panel Control menu
NOTE: Display Control icon strips are available only if you’re using a Windows operating system.
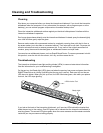
To activate the SMART Bulb Saver
Sleep Mode
Activation
Input Source
Selection
Display Mode
Toggle
Panel Control
Menu