6
See the given pages for further description.
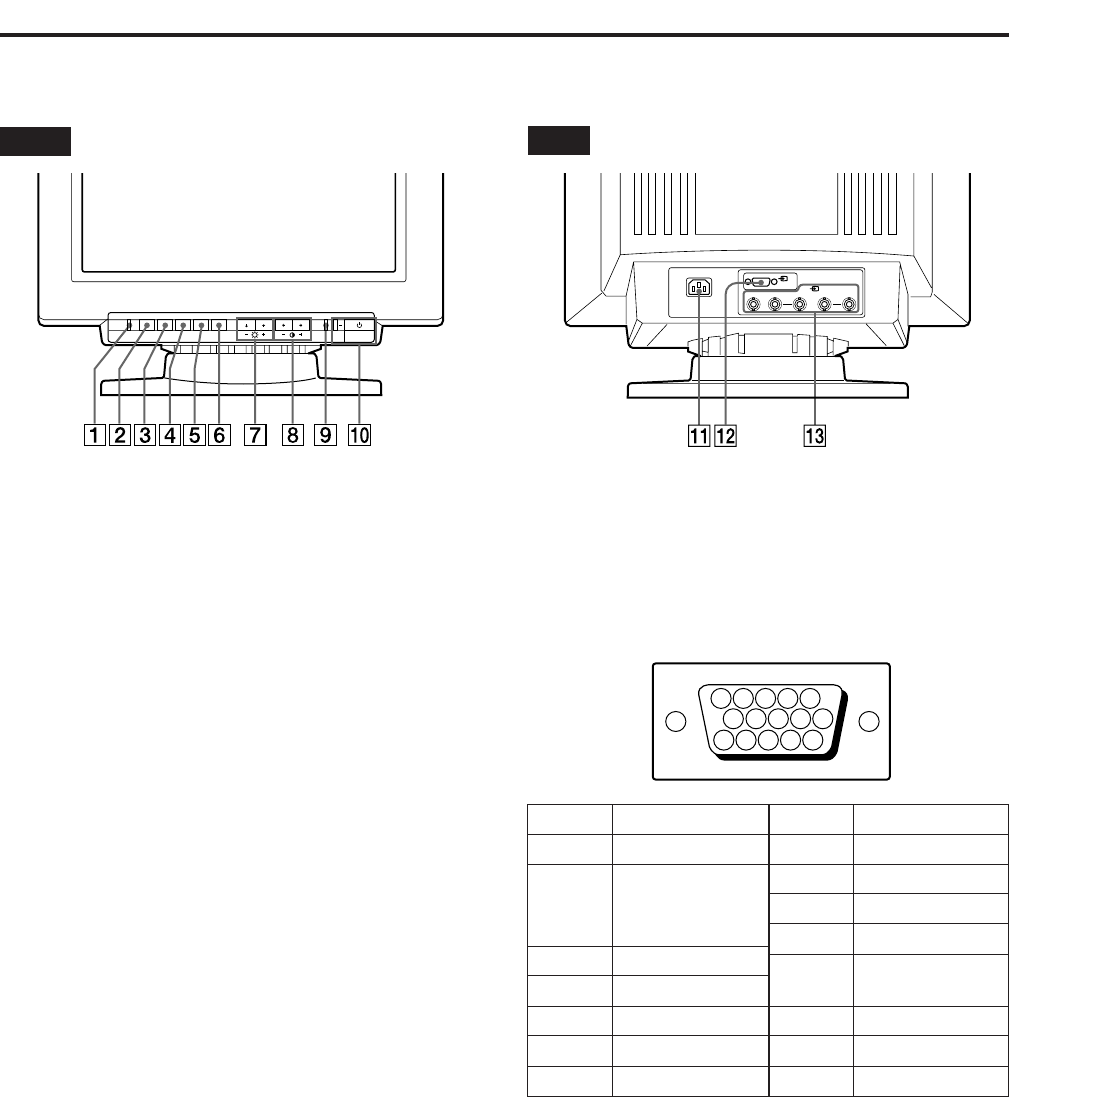
Front Rear
1 RESET button (page 11)
Press to reset the adjustment data to the factory-preset
levels.
2 OPTION button (page 9-11)
Press to set the option items, such as control lock and
color temperature.
3 CONV (convergence) button (page 9)
Press to adjust the vertical and horizontal convergence.
4 GEOM (geometry) button (page 8)
Press to adjust the rotation and pincushion.
5 SIZE (picture size) button (page 8)
Press to adjust the vertical and horizontal picture size.
6 CENT (center) button (page 7)
Press to adjust the vertical and horizontal picture
position.
7 ¨ (brightness) –/+ (./>) buttons (page 7-11)
Press to adjust the brightness.
–/+ (./>) buttons also adjust the each item.
8 > (contrast) –/+ (?//) buttons (page 7-11)
Press to adjust the contrast.
–/+ (?//) buttons also adjust the each item.
9 POWER SAVING indicator (page 12)
Lights up when the monitor is in the Power Saving
Modes.
0 u power switch and indicator (page 12)
Press to turn the monitor on or off. The indicator lights
up when the monitor is turned on.
!¡AC IN connector
Plug in an AC power cord.
!™ Video input 1 connector (HD15)
The cable accepts RGB video signals (0.714 Vp-p,
positive) and SYNC signals.
Pin No.
1
2
3
4
5
6
7
Signal
Red
Green
(Composite
Sync on Green)
Blue
—
DDC Ground*
Red Ground
Green Ground
Signal
Blue Ground
DDC + 5V*
Ground
—
Bi-Directional
Data (SDA)*
H. Sync
V. Sync
Data Clock(SCL)*
Pin No.
8
9
10
11
12
13
14
15
*
Display Data Channel (DDC) Standard by VESA
!£Video input 2 connectors (5 BNC)
The cable accepts RGB video signals (0.714 Vp-p,
positive) and SYNC signals.
5 4 3 2 1
8 7 6
15 14 13 12 11
10 9
RESET OPTION CONV GEOM SIZE CENT
POWER
SAVING
2 (BNC)
1
(HD15)
RG BHDVD
Functions of Controls


