


32
Using Network Features
B Network
Using Network
Features
Connection to the network allows you to
operate the following features:
• Checking the current status of the
projector via a Web browser.
• Remotely controlling the projector via a
Web browser.
• Receiving the e-mail report for the
projector.
• Making the network settings for the
projector.
• Supports network monitoring and control
protocol (Advertisement, PJ Talk, PJ Link,
SNMP, AMX DDDP [Dynamic Device
Discovery Protocol], Crestron
RoomView).
• The menu displays used for the explanation
below may be different depending on the
model you are using.
• Supported Web browsers are Internet
Explorer 8/9/10.
• The menu displays only English.
• If the browser of your computer is set to [Use
a proxy server] when you have access to the
projector from your computer, click the
check mark to set accessing without using a
proxy server.
• SNMP, AMX DDDP, and Crestron
RoomView do not support IPv6.
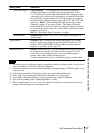
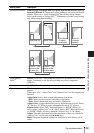
1 Connect the LAN cable.
2 Set the network settings for the
projector using “Network Setting” on
the Connection/Power menu
(page 26).
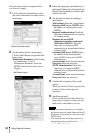
3 Start a web browser on the computer,
enter the following in the address field,
then press the Enter key on your
computer.
http://xxx.xxx.xxx.xxx
(xxx.xxx.xxx.xxx: IP address for the
projector)
When connecting with IPv6
addresses
http://[xxxx:xxxx:••• xxxx]
You can confirm the IP address of the
projector under “Network Setting” on
the Connection/Power menu (page 26).
The following window appears in the
Web browser:
Once you make the network settings, you
can open the Control window only by
performing step 3 of this procedure.
Notes
Displaying the Control
Window of the Projector with
a Web Browser
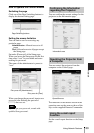
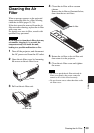
LAN cable
(straight type)
(not supplied)
Hub, router, etc
LAN
Connector