


31
GB
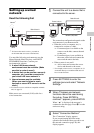
Network connections
8
Enter the values for the “Secondary
DNS” setting, and then press
ENTER.
9
When “Save settings and check
connection. Press ENTER to
continue.” appears, press ENTER.
When the network settings have been
completed, “Complete.” appears.
Tip
If you want to obtain the IP address automatically using
DHCP, select “Auto” for the “IP Address Settings” in step
4. If you select “Auto” in step 4, the “DNS Settings”
selection display appears afterwards. In this case, select
“Auto” or “Manual” for “DNS Settings” and enter the
respective values following the instructions that appear on
the display.
To use a proxy server
If you need to use a proxy server (for example,
when you are instructed to use a proxy server by
your Internet service provider), be sure to prepare
the proxy address and the port number in advance.
1
Press SETTINGS to enter the
settings menu and select “Network
Settings.”
2
When “Playback and network
functions cannot be used during the
setup. Press ENTER to continue.”
appears, press ENTER.
When “ ” is displayed, the message is
continued to the next page. Press m to see the
entire text string.
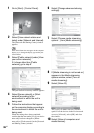
3
Select “Tools” - “Advanced Settings.”
4
Select “Proxy Settings” - “Use.”
5
Enter the values for “Proxy Address”
and “Proxy Port.”
When you enter the proxy address, press
ENTER so that the “Proxy Port” display
appears. Enter the proxy port number.
For details on how to input characters, see
“Entering text” (page 18).
6
When “Save settings and check
connection. Press ENTER to
continue.” appears, press ENTER.
When the network settings have been
completed, “Complete.” appears.
Confirming the network
settings
You can confirm the network status and settings.
1
Press SETTINGS to enter the
settings menu and select “Network
Settings.”
2
When “Playback and network
functions cannot be used during
the setup. Press ENTER to
continue.” appears, press ENTER.
When “ ” is displayed, the message is
continued to the next page. Press m to see the
entire text string.
3
Select “Tools” - “Connection
Diagnosis.”
Connection status appears as “Result:.”
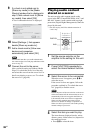
4
Select the item you want to check.
You can select from “Connection Method,”
“SSID*,” “Signal Strength*,” “Security
Method*,” “IP Address” (“IP Address,”
“Subnet Mask,” and “Default Gateway”),
“DNS” (“Primary DNS” and “Secondary
DNS”) and “Proxy Server” (“Address” and
“Port”).
* Appears only when a wireless network is being
used.
When an error has occurred, “!” appears next
to the error item.