


44
nN
Connecting peripheral devices
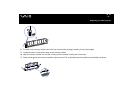
Connecting a Universal Serial Bus (USB) device
You can connect a USB device such as a scanner, a floppy disk drive or a printer, to your VAIO desktop.
To connect a USB device, simply plug in the USB cable of the device into one of the ports on your system unit.
USB devices are hot plug and play devices. You do not need to shut down your computer prior to connecting these devices unless
the manual supplied with the device states otherwise.
For some USB devices you need to install the software before you connect the device. Not following this procedure might cause the
device not to work properly. For more information, check the manual provided with the USB device.
Connecting a USB printer
To connect a printer, you can use either the printer port or a USB port, depending on the cable you use for your printer. Please see
your printer’s documentation for details on connection and installation.
Always check the printer manufacturer’s website for the latest drivers for your operating system. Some printers do not function
properly without updated drivers.
USB printer drivers should be automatically installed. Once you plug the printer’s USB cable into one of the USB ports on your
computer, the Found New Hardware Wizard will guide you through any setup procedure you need to follow.
If the printer is not automatically installed, you can try the following:
1 From the Control Panel, select Printers and Other Hardware, then Printers and Faxes.
2 Under Printer Tasks, click Add a printer.
3 Let the Add Printer Wizard guide you through the installation process.
4 Click Finish.
The printer is now installed.
✍ This procedure applies for most, but not for all printers.