


50
nN
Upgrading your VAIO computer
Viewing the amount of memory
To view the amount of memory, proceed as follows:
1 Turn on the computer.
2 Click the Start button, point to All Programs, Security & Utilities, then VAIO System Information, and click VAIO System
Information again.
You can view the amount of installed memory here.
Adding / replacing a memory module
If you are not familiar with upgrading memory on a computer, we highly recommend that you contact your dealer.
To add or change a memory module, proceed as follows:
1 Shut down the computer, unplug it, and remove any peripheral devices.
2 Wait for the computer to cool down.
The inside of the main unit becomes very hot during operation. Wait for about one hour for the computer to cool down before
opening the unit.
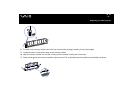
3 With the main unit’s back panel facing you, slide the back panel up until you cannot go any further.
As you slide the back panel up, a ’button’ appears (middle of the back of your computer).
4 When you push this button, you can remove the back panel completely.
5 Set the back panel aside.
A metal panel, the ’memory cover’, appears.
6 Remove the 2 screws with a + screw driver and remove the memory cover.
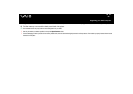
7 To remove an existing memory module, release the end latches and gently lift out the module, as shown (may vary from actual
configuration):