VPL-CS10/CX10
4-079-300-12 (2)
D:\Nouhin\W00001VPL-
CS10CX10\4079300122\4079300122VPLCS10CX10WW\02GB-
VPLCS10.CX10WW\03OVR.fm
masterpage:Left
GB
12
Location and Function of Controls
7 Arrow keys (M
MM
M/m
mm
m/<
<<
</,
,,
,)
Select the menu or to make various
adjustments.
8 RESET key
Resets the value of an item back to its
factory preset value. This key functions
when the menu or a setting item is
displayed on the screen.
9 MENU key
Displays the on-screen menu. Press
again to clear the menu.
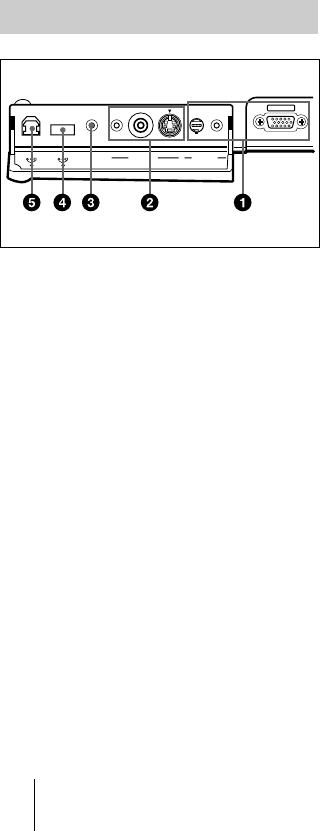
1 INPUT A connector
Connect to external equipment such as a
computer.
• INPUT A connector (HD D-sub 15-
pin, female): Connects to the monitor
output on a computer using the
supplied cable.
When inputting a component or 15k
RGB signal, use an optional cable.
For details, see “To connect a 15k RGB/
Component equipment” on page 19.
• AUDIO (stereo minijack)
connector: Connects to the audio
output of the computer.
• MOUSE connector (6-pin):
Connects to the PS/2 mouse port on a
computer via the supplied mouse
cable, to control the mouse function of
the connected computer.
2 VIDEO IN connector
Connect to external video equipment
such as a VCR.
• S VIDEO (mini DIN 4-pin):
Connects to the S video output (Y/C
video output) of video equipment.
• VIDEO (phono type): Connects to
the composite video output of video
equipment.
• AUDIO (stereo minijack)
connector: Connects to the audio
output of the VCR.
3 CONTROL S IN/PLUG IN
POWER (DC 5V output) jack
Connects to the control S out jack of the
Sony equipment.
Connects to the CONTROL S OUT jack
on the supplied Remote Commander
when using it as a wired Remote
Commander. In this case, you do not
need to install the batteries in the
Remote Commander, since the power is
supplied from this jack.
4 USB connector (USB A-plug for
downstream, 4-pin)
Connect to USB equipment such as a
mouse, camera, etc.
5 USB connector (USB B-plug for
upstream, 4-pin)
Connect to the USB connector on a
computer.
When you connect the projector to the
computer, the projector recognizes the
mouse of the computer connected to the
INPUT A connector and you can control
the mouse function with the supplied
Remote Commander. The supplied
application software can be installed in
the computer attached to this connector.
Connector Panel
INPUT A
CONTROL S
IN / PLUG IN
POWER
VIDEO IN INPUT A
Rear side


