


14 (EN)
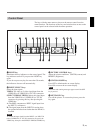
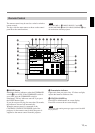
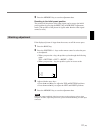
4 RGB SHIFT key
Enters the shift adjustment mode for the input signal.
Next adjust the position of the picture using the four
arrow keys. The picture shifts in the direction of the
arrow on the pressed key.
Press the MEMORY key 8 to store the adjusted value
and display the adjusted picture.
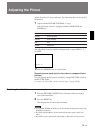
5 RGB SIZE key
Enters the size adjustment mode for the input signal.
Next adjust the size of the picture using the four arrow
keys.
B : to reduce horizontal size
b : to expand horizontal size
V : to expand vertical size
v : to reduce vertical size
Press the MEMORY key 8 to store the adjusted value
and display the adjusted picture.
6 COMMAND ON/OFF switch
No key on the remote control except the LIGHT button
1 function when this switch is set to OFF. This saves
battery power.
7 CENT R/B keys
Enter the centering adjustment mode of the red and
blue.
R: Press to enter the red centering adjustment mode.
B: Press to enter the blue centering adjustment mode.
Perform the centering adjustment using the four arrow
keys.
8 MEMORY key
Stores various adjusted data into memory.
9 POWER ON/OFF key
Turns on and off the projector when the MAIN
POWER switch on the projector is set to ON.
0 Menu operation keys
Used for various adjustment functions and for menu
operations.
MENU: Displays the main menu. Press it again to
turn off the menu.
Arrow keys: Adjusts the value or selects the item in
the menu.
ENTER: Stores the settings in the menu.
!¡ RESET key
Resets the adjusted levels to the factory preset or
service preset levels.
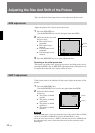
!™ POSITION +/– keys
Select the position to be adjusted on the screen in
blanking adjustment mode.
Also, set V SHIFT to WIDE or NARROW in the
RGB input signal’s SHIFT adjustment mode.
!£ PICTURE CONTROL keys
Adjust the picture conditions: CONTR (contrast),
BRIGHT (brightness), COLOR, HUE and SHARP
(sharpness).
!¢ VOLUME +/– keys
These keys do not function with this projector.
!∞ SWITCHER/INDEX select switch
Selects the function of the SWITCHER/INDEX keys.
Set to SWITCHER to select the input from the PC-
1271/1271M Signal Interface Switcher.
Set to INDEX to assign the index number of each
projector when multiple projectors are used.
!§ SWITCHER/INDEX keys
When the SWITCHER/INDEX select switch is set
to SWITCHER
When the PC-1271/1271M switcher (not supplied) is
connected to the projector, press a number key (1 – 8)
to select the input from the switcher. The number key
9 does not function.
To select the input from the second switcher (when
the SINGLE/SECOND/OTHER switch on the
switcher is set to SECOND), press a number key
between 1 and 8 within two seconds after pressing the
SECOND key.
When the SWITCHER/INDEX select switch is set
to INDEX
When multiple projectors are connected, select the
index number, which is set with the INDEX NO.
switch on the rear panel, of the projector to be
adjusted. Press a number key (1 – 9) to designate the
index number, then press the ENTER key. When
adjusting all the projectors simultaneously, press the 0
(ALL) key, then the ENTER key.
Location and Function of Controls