


Projecting 19
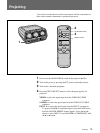
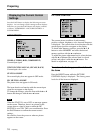
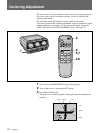
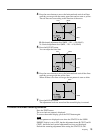
4 Press the arrow buttons to move the horizontal and vertical red lines
until they converge with the center green lines and are seen as yellow.
The red lines move according to the direction of the arrow.
H: Horizontal adjustment level (MIN, –126 – +126, MAX)
V: Vertical adjustment level (MIN, –126 – +126, MAX)
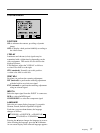
5 Press the B CENT button.
You can adjust the blue lines.
6 Press the arrow buttons to move the horizontal and vertical blue lines
until they converge with the yellow lines.
When all three color lines converge, the test pattern is seen as white.
7 Press the B CENT button.
The adjustment levels are stored and the normal display is restored.
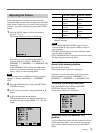
To check the current centering condition
Press the TEST button.
The cross-hair test pattern is displayed.
To restore the normal display, press the TEST button again.
Note
The test patterns are displayed even when the STATUS in the USER
PRESET display is set to OFF, but the adjustment items (R CENT and B
CENT), horizontal and vertical adjustment levels are not displayed.
Perform the centering adjustment after setting the STATUS to ON.
white
yellowblue
blue
yellow
yellow
yellow
blue
white
blue