


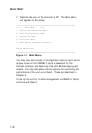
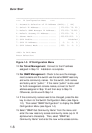

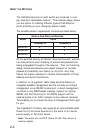

___________________________________________________
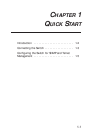
>>>> IP Configuration Menu <<<<
1. Automatic Selection of IP Address (DHCP).. [ ON]
2. Switch IP Address.. ............. [ 170.129. 78. 28 ]
3. Default SNMP Manager IP Address.. [ 170.129. 78.208 ]
4. Default Gateway IP Address....... [ 170.129. 78. 1 ]
5. Subnet Mask...................... [ 255.255.255. 0 ]
6. SLIP Enable...................... [ Disabled ]
7. SLIP IP Address.................. [ 0. 0. 0. 0 ]
8. SLIP Subnet Mask..... ........... [ 255. 0. 0. 0 ]
<ESC> To Exit Menu
Enter Selection:
___________________________________________________
Figure 1-3. IP Configuration Menu
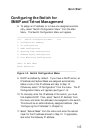
12. For Telnet Management: Connect to the IP address
assigned in Step 10. Installation is complete.
13. For SNMP Management: Check to be sure the manage-
ment console and the switch use the same SNMP read-only
and write community names. For the switch, both names
are factory-set to “public.” If the name “public” is also used
for both management console names, connect to the IP
address assigned in Step 10 and then skip to Step 15.
Otherwise, continue with Step 14.
14. If the community names need to be changed, press the Esc
key to return to the Switch Configuration Menu (see Figure
1-2). Then select “SNMP Configuration” to display the SNMP
Configuration Menu (see Figure 1-4).
15. Select “SNMP Get Community Name” from the menu and
enter the new read-only access community name (up to 10
alphanumeric characters). Then, select “SNMP Set
Community Name” and enter the new write access commu-
1-6
QUICK START