


Instruction Manual
7
Resolving Conicts
When a RAID set is created, the metadata written to the disk includes drive connection information
including the channel on the host adapter to which it is connected. If after a disk failure the
replacement disk was previously part of a RAID set or used in another system, it may have conicting
metadata, specically in reference to the drive connection information. If so, this will prohibit the
RAID set from being either created or rebuilt. In order for the RAID set to function properly, this old
metadata must be rst overwritten with the new metadata. To correct this, select “Resolve Conict”
and the correct metadata, including the correct drive connection information, will automatically be
written to the replacement disk.
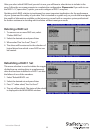
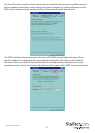
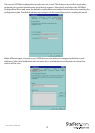
1. Select “Resolve Conicts” and press Enter.
2. Select the “Conict” entry in the Logical Drive Status window and press Enter.
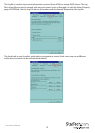
3. Note that some conict resolutions may result in the drive letter assignment changing; for
example the RAID set may have been drive D: but after the conict resolution, it may become
drive E:. Be aware of this when performing a conict resolution. To maintain the same drive
lettering, the SATA cables connected to the drives may need to be swapped, or in the case of
a SATA-based removable drive unit, the order of the drives within the chassis may need to be
changed. Press ‘Y’ to accept the change and resolve the conict.
4. Once the conict is resolved, the RAID Set will appear in the Logical Drive window.
Low Level Formatting
The Low Level Format menu selection allows the complete erasure of data on a hard drive. This is
not an action that typically needs to be performed, as formatting the drive under Windows is usually
sucient to prepare the drive for use.
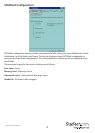
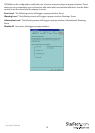
Logical Drive Information
This menu item allows the display of the assignment of physical drives within a logical set (RAID set,
RAID 1 spare, or unassigned). It is a display-only function. Use the up and down arrow keys to scroll
between the drives in the Logical Drive Properties window. Press the [ESC] key when done viewing
logical drive information.
Allocating Partitions
After the RAID set(s) have been created, the BIOS reports the new set(s) as a new drive attached
to the system. This drive must have a partition dened on it, then the drive must be formatted in
preparation for use under Windows. For further information regarding partition management from
within your Operating System, please consult the accompanying documentation located on the
Drivers CD in the folder entitled SATA Raid_4Port\Sil3114\Win98_me_2000_xp_nt4.0\GUI.