


2-6
S
UPERSERVER 5014C-MF User's Manual
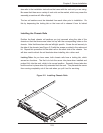
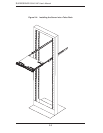
Installing the Server into the Rack
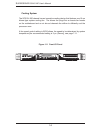
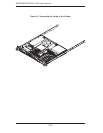
You should now have rails attached to both the chassis and the rack unit. The next
step is to install the server into the rack. Do this by lining up the rear of the chassis
rails with the front of the rack rails. Slide the chassis rails into the rack rails, keeping
the pressure even on both sides (you may have to depress the locking tabs when
inserting). The server may not slide in easily when installed for the fi rst time; some
adjustment to the rails might be necessary. See Figure 2-3.
When the server has been pushed completely into the rack, you should hear the
locking tabs "click". Finish by inserting and tightening the thumbscrews that hold
the front of the server to the rack.
When removing the server from a rack, you will need to release the locking tabs
on both rails to pull the unit completely out of the rack.
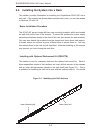
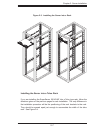
Installing the Rack Rails
Locate a pair of front (short) and rear (long) brackets in the rackmount kit. The
brackets are marked with arrows to distinguish front from rear. Secure the front
and rear brackets to the rack rails using the screws and washers provided, but do
not fully tighten. Determine where you want to place the SuperServer 5014C-MF
in the rack (see Rack and Server Precautions in Section 2-3). Adjust the length
of the rails according to the depth of the rack. Now tighten the screws holding the
brackets to the rails.
Next, secure the rail to the rack with the screws provided. Repeat this procedure
to attach the other rail to the other side of the rack, making sure that both are at
the exact same height.