


2-2
SUPER P3TDDR User’s Manual
2-2 Processor Installation
When handling the processor package, avoid placing
direct pressure on the label area of the fan.
The following pages cover the installation procedures. You should install
the processor in the motherboard first, then install the motherboard in the
chassis, then the memory and add-on cards, and finally the cables and
drivers. Following the installation procedures in the order they appear in
this chapter should eliminate the most common problems encountered when
building a system.
IMPORTANT: Always connect the power cord last, and always re-
move it before adding, removing or changing any hardware compo-
nents.
Processor
You are now ready to install the processors. Your P3TDDR motherboard
has two 370-pin, FCPGA type sockets that support single or dual 370-pin
Pentium III FCPGA (not SEPP) 500 MHz - 1.26+ GHz processors (including
low power Pentium III processors) at Front Side Bus speeds of 100 and 133
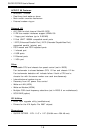
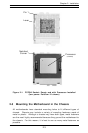
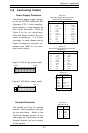
MHz. Lift the lever on the FCPGA socket and install with the notched corner
of the processor oriented with pin 1. Fully seat the processor into the
socket and then close the lever. See Figure 2-1 for views of the FCPGA
370-pin socket before and after processor installation.
Heatsink
Follow the instructions that came with your processors and heatsinks to
attach heatsinks to the processors. Each of your heatsinks should have a
3-pin fan connector, which should be connected to the CPU FAN header.
Make sure that good contact is made between the processors and the
heatsinks. Insufficient contact, incorrect types of heatsinks, fans, or ther-
mal compound used or improper amount of thermal compound applied on the
CPU die can cause a processor to overheat, which may crash the system.
!