Upgrading from previous versions of Backup Exec
14 Quick Installation Guide
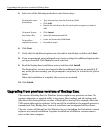
5. Select one of the following methods to enter license keys:.
6. Click Next.
7. Verify that the additional options are selected for installation, and then click Next.
8. If you are prompted, enter information or choose settings for additional options that
you want to install. Click Next after each selection.
9. Read the Backup Exec installation review, and then click Install.
The Backup Exec services are stopped while the additional options are installed. If
any active jobs are running, you are prompted to stop them, or to wait for the jobs to
finish.
When the installation is complete, the services are restarted.
10. Click Finish.
Upgrading from previous versions of Backup Exec
This version of Backup Exec for Windows Servers replaces any previous versions. No
separate migration or upgrade utility is necessary. Most settings and all catalogs and
data directories from previous versions of Backup Exec are kept (for example, when the
TSM option adds registry settings). At the end of the installation, the upgrade process is
summarized. Only Backup Exec version 9.x and later can be migrated to this release.
The new version of Backup Exec for Windows Servers (including the Evaluation version)
replaces any current installation. Separate installations of different versions cannot
exist on the same computer.
To manually enter
license keys
◆ Type a license key into the license key field.
◆ Click Add.
◆ Repeat for each license key for each option or agent you want to
add.
To import license
keys from a file
◆ Click Import.
◆ Select the besernum.xml file.
To install an
evaluation version
◆ Leave the license key field blank.
◆ Proceed to step 6.


