AC Adapter Operation
• Plug the supplied AC adapter into the DC Jack on the back of the
unit, then plug the cord into an outlet.
• If you are using a different AC adapter then the one supplied, make
sure that it is a 6V, 300mA Positive Center AC adapter.
Setting the Clock Time and Calendar
Important
•While setting the time or calendar, if you do not press the appropriate
buttons (as explained below) within approximately 8 seconds the display
will stop flashing. If this happens you must follow the steps again from
step 1.
• While setting the time, if you press and hold the µ ¸ FWD or REV
button the minutes will begin at a moderate pace, then get faster. This
will assist you in setting the time both fast and exact.
Setting the Clock Time
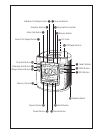
1. Press and hold the ƽ Time Set button until the display begins flashing.
2. Press the µ ¸ FWD or REV button to set the correct time. REMEMBER
to set the correct AM or PM. The PM Indicator is located on the
upper left side of the display.
3. Press the ƽ Time Set button to return to normal mode. A beep will
confirm that the time is set.
Setting the Calendar
1. Press and hold the Ƽ Calendar Set button until the display begins
flashing.
2. Press the µ FWD (Month) button to set the correct month.
3. Press the ¸ REV (Date) button to set the correct day.
4. Press the Ƽ Calendar Set button to return to normal mode. A beep
will confirm that the calendar is set.
Listening to Instant Weather
Fully extend the wire antenna and vary the direction for the strongest signal.
Important – If the ᕢ Weather On/Sleep button is pressed more than
once the unit will enter the sleep mode. At the bottom of
the display the calendar will change to the Sleep Time
Indicator (90, 60, 30, 15). The Sleep Volume Indicator
will also appear at the bottom of the display. Press the ᕤ
Off/Reset button to turn the weather off, then press the ᕢ
Weather On/Sleep button again (only once).


