


3. Scan to File
34 Scanning Guide — How to Perform Scan to File
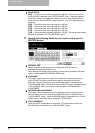
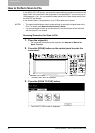
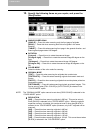
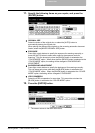
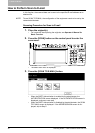
10. Specify the following items as you require, and press the
[Next] button.
z SINGLE/2-SIDED SCAN
[SINGLE] — Press this when scanning only the front page of originals.
[BOOK] — Press this when scanning both side of originals in the same
direction.
[TABLET] — Press this when scanning front page in the general direction, and
scanning back page rotated 180 degree.
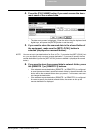
z ROTATION
[0 degree] — Press this not to rotate the scanned image.
[90 degree right] — Press this to rotate the scanned image 90 degree on the
right.
[180 degree] — Press this to rotate the scanned image 180 degree.
[90 degree left] — Press this to rotate the scanned image 90 degrees on the
left.
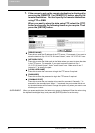
z COLOR MODE
Select the button of the color mode for scanning.
z ORIGINAL MODE
[TEXT] — Press this when scanning the originals that contain texts.
[TEXT/PHOTO] — Press this when scanning originals that contain texts and
photos.
[PHOTO] — Press this when scanning originals that contain photos printed on
photographic paper.
[PRTD IMAGE] — Press this when scanning originals as printed images. This
can be set only when [FULL COLOR] or [AUTO COLOR] is selected in the
“COLOR MODE” option.
NOTE: The “ORIGINAL MODE” option cannot be set when [GRAY SCALE] is selected in the
“COLOR MODE” option.
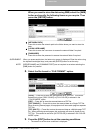
z RESOLUTION
[600] — Press this when scanning originals in 600 dpi. This can be set only
when [BLACK] is selected in the “COLOR MODE” option. When the optional
expansion memory is installed, this can be set even if other than [BLACK] is
selected in the “COLOR MODE” option (However, only A4/LT originals can be
scanned).
[400] — Press this when scanning originals in 400 dpi.
[300] — Press this when scanning originals in 300 dpi.
[200] — Press this when scanning originals in 200 dpi.
[150] — Press this when scanning originals in 150 dpi.
[100] — Press this when scanning originals in 100 dpi. This cannot be set when
[BLACK] is selected in the “COLOR MODE” option.