


10
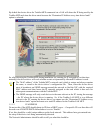
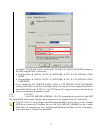
Double click the icon to open the driver’s status window then click the “General” tab and make sure
it says “Waiting for job…”
• Check that no firewall is running on either PC that prevents connections to port 25 on the Network
Viewer/SmartLink2000 PC from the other PC.
Type “QUIT” and press ENTER to exit TELNET.
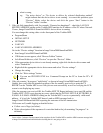
Check that Network Viewer/ImageVision2000/SmartLink2000 PC can
communicate with Toshiba MFP’s SMTP server
At the Network Viewer/SmartLink2000 PC…
Windows 95(OSR2)/98/Me/NT4:
• Click “Start, Run”
• Type:
TELNET aaa.bbb.ccc.ddd 25
Where aaa.bbb.ccc.ddd is the IP of the Toshiba MFP
• Press ENTER
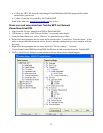
Windows 2000/XP
• Start a command prompt:
Click “Start, Programs, Accessories, Command Prompt”
• Type:
TELNET aaa.bbb.ccc.ddd 25
Where aaa.bbb.ccc.ddd is the IP of the Toshiba MFP
• Press ENTER
You should now see a line that says:
220 ESMTP Service Ready
If TELNET gets disconnected immediately it is likely that the LAN FAX SRV ADDRESS is set
incorrectly on the Toshiba MFP. If it remains connected, type "QUIT" [ENTER] to exit from the server.
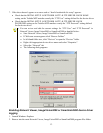
Check can send fax messages successfully from
ImageVision2000/SmartLink2000 via Toshiba MFP
1. Start ImageVision2000/SmartLink2000.
2. Create a new message to a fax number:
a. If Welcome is visible, click “Browse Folders” to open the main display.
b. Press Ctrl+N
c. Enter a fax number into the “To:” field.
d. Enter a brief Subject and Message.
e. Click “Send”
The job should enter ImageVision2000/SmartLink2000’s Outbox and shortly change status from
“Pending” to “In Progress”.
• If the job shows a status of “Problem” the text after the word “Problem” should indicate