


User’s Manual 3-11
Getting Started
3. Turn on your computer to open Windows Vista.
4. Insert the (first) blank media into the tray of the Optical Drive.
5. Double Click the Recovery Disc Creator icon on the Windows Vista
desktop, or select the application from Start menu.
6. After TOSHIBA Recovery Disc Creator starts, select the type of media
and the title you wish to copy to the media then click the Create button.
Restoring the preinstalled software from the
Recovery HDD
Part of the space on the hard disk drive is reserved as recovery partition for
restoring the pre-installed software from the hard disk drive.
When re-setting up your hard disk, do not change, delete or add partitions
in a manner other than specified in the manual. Otherwise, space for
software may be destroyed.
In addition, if you use a third-party partitioning program to reconfigure
partitions on your hard disk, it may become impossible to re-setup your
computer.
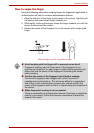
1. Turn off your computer.
2. Hold down the 0 (zero) key on the keyboard and turn on your computer.
When “TOSHIBA Leading Innovation >>>” appears, release the 0
(zero) key on the keyboard.
3. A menu appears. Follow the on-screen instructions.
If your Optical Drive can only write to CDs, select "CD" as the "Disc Set" on
TOSHIBA Recovery Disc Creator If your Optical Drive of your computer
can write to either CD or DVDs, select the one you are using as the "Disc
Set" on TOSHIBA Recovery Disc Creator.
You can not use System Recovery Options if restoring the pre-installed
software without System Recovery Options.
When you reinstall the Windows operating system, the hard disk will be
reformatted and all data will be lost.