


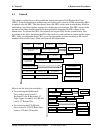


4 Replacement Procedures
Satellite L670/L675/Pro L670 Maintenance Manual [CONFIDENTIAL]
Figures
Figure 4.1 Removing the Battery Pack .................................................................................. 4-8
Figure 4.2 Removing the logic lower door .......................................................................... 4-10
Figure 4.3 Removing the HDD from the HDD bay ............................................................. 4-11
Figure 4.4 Removing the HDD aluminum ........................................................................... 4-12
Figure 4.5 Installing the HDD aluminum ............................................................................ 4-13
Figure 4.6 Installing the logic lower door............................................................................ 4-14
Figure 4.7 Removing the RAM from the connectors .......................................................... 4-15
Figure 4.8 Removing the ODD ............................................................................................ 4-17
Figure 4.9 Removing the ODD bracket from the ODD ....................................................... 4-18
Figure 4.10 Removing the keyboard cover .......................................................................... 4-19
Figure 4.11 Removing screws securing the keyboard ......................................................... 4-20
Figure 4.12 Removing the keyboard .................................................................................... 4-20
Figure 4.13 Removing twenty-one screws from the bottom of the laptop .......................... 4-22
Figure 4.14 Removing five screws and disconnecting one FFC from the motherboard ..... 4-23
Figure 4.15 Removing the logic upper assembly from the laptop ....................................... 4-24
Figure 4.16 Removing the touchpad FFC ............................................................................ 4-25
Figure 4.17 Removing the WLAN Card .............................................................................. 4-26
Figure 4.18 Removing two screws securing the modem card ............................................. 4-28
Figure 4.19 Disconnecting the cable from the modem card ................................................ 4-29
Figure 4.20 Disconnecting the FFC from the motherboard ................................................. 4-30
Figure 4.21 Disconnecting the ODD board FFC ................................................................. 4-31
Figure 4.22 Removing the touchpad button board .............................................................. 4-32
Figure 4.23 Disconnecting the FFC from the motherboard ................................................. 4-33
Figure 4.24 Removing the power board .............................................................................. 4-34
Figure 4.25 Removing the Bluetooth card ........................................................................... 4-35
Figure 4.26 Disconnecting the Bluetooth cable ................................................................... 4-35
Figure 4.27 Removing the display assembly ....................................................................... 4-38
Figure 4.28 Installing the display assembly ......................................................................... 4-39
Figure 4.29 Removing the thermal fan from the logic lower assembly ............................... 4-40
Figure 4.30 Removing the motherboard from the logic lower assembly ............................ 4-41
Figure 4.31 Removing the speakers ..................................................................................... 4-43