


2
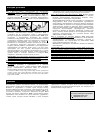
CAUTION: The UPS must be plugged into a live AC outlet and
turned on for 24 hours after initial installation to fully charge the
internal battery. Connected equipment will receive utility-
supplied AC power (if present) immediately after the UPS is
plugged in and turned on, but connected equipment will not
receive full battery backup in the event of a blackout or severe
brownout unless the internal battery is fully charged.
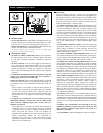
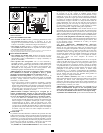
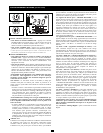
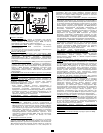
STEP 1: Place the UPS in a horizontal or vertical (tower) position.
To install the UPS in a 4-post rack, attach the included hardware to the
UPS as shown in diagram . To install the UPS in a 2-post rack,
attach the included hardware to the UPS as shown in diagram .
Then, using an assistant if necessary, lift the UPS and attach it to a
standard rack with user-supplied hardware. The UPS will stand in a
tower position without the aid of the included hardware. For increased
stability, however, Tripp Lite recommends attaching the included
hardware as shown in diagram . In either position, the user must
determine the fitness of hardware and procedures before installation.
The UPS and included hardware are designed for common rack types
and may not be appropriate for all applications. The LCD display may
be rotated to match the orientation of the UPS. Carefully insert a small
tool in the slots at the side of the LCD to remove it from the UPS
housing, then rotate the LCD and press it back into place.
CAUTION: To balance the UPS safely when placed in a vertical
position, make sure the LCD Display is located at the top of the
front panel.
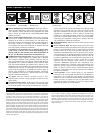
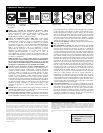
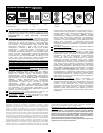
STEP 2: Connect a user-supplied power cord* to the UPS, then
plug the UPS into a wall outlet.**
After plugging the UPS into a wall outlet, push the ON/OFF button
for one second to turn the UPS on (see Basic Operation section).
Please Note! The UPS will not turn on automatically in the
presence of live utility power.
*The UPS system does not include an input power cord. The user-supplied power cord
should have an IEC-320-C13 connector (commonly found on detachable power cords
for desktop computers) at one end in order to connect to the AC input of the UPS.
**Use an outlet that doesn't share a circuit with a heavy electrical load such as an air
conditioner or refrigerator.
STEP 3: Plug your equipment into the UPS.
Insert the female connectors of the detachable power cords that
came with the UPS system into the AC inputs of the attached
equipment. Insert the male connectors into any of the UPS system's
available outlets.
The UPS is designed to support electronic equipment only.
Connected equipment will overload the UPS if the total VA ratings
for all the equipment connected to the outlets exceeds the UPS
Output Capacity. To find VAratings, look at equipment nameplates.
If the equipment is listed in amps, multiply the number of amps by
230 volts to determine VA. (Example: 1 amp × 230 volts = 230 VA).
If unsure whether the outlets are overloaded, run a self-test (see
“MUTE/TEST” Button description).
STEP 4: Optional Installation. The UPS includes USB and RS-232
communication ports as well as Tel/DSL/Ethernet and Coaxial
surge protection jacks. These connections are optional; the UPS
will work properly without these connections.
Not compatible with PoE (Power over Ethernet) applications.
C
B
A
A
C
B
Quick Installation
Storage
To avoid battery drain, all connected equipment should be turned off
and disconnected from the UPS. Press and hold the ON/OFF button
for one second. Your UPS will be completely turned off (deactivated),
and will be ready for storage. If you plan on storing your UPS for an
extended period, fully recharge the UPS batteries every three months.
Plug the UPS into a live AC outlet, turn it on by pressing and holding
the ON/OFF button for one second, and allow the batteries to
recharge for 24 hours. If you leave your UPS batteries discharged for
a long period of time, they will suffer a permanent loss of capacity.
Note on Labeling
Two symbols are used on the label.
V~ : AC Voltage
V : DC Voltage