


3
Basic Operation
(Front Panel)
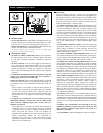
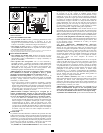
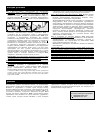
“ON/OFF” Button
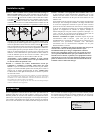
• To Turn the UPS On: Press and hold the ON/OFF Button for one
second.* If utility power is absent, pressing the Button will “cold-
start” the UPS, i.e. turn it on and supply power from battery.**
• To Turn the UPS Off: Press and hold the ON/OFF Button for one
second.* The UPS will be turned off completely.
* The alarm will beep once after one second has passed. ** Providing runtime
proportionate to the UPS battery's level of charge.
“MUTE/TEST” Button
• To Silence (or “Mute”) UPS Alarms: Briefly press and release
the MUTE/TEST button. Note: continuous alarms that warn
to shut down connected equipment immediately cannot be
silenced.
• To Run a Self-Test: with the UPS plugged in and turned on,
press and hold the MUTE/TEST button for two seconds.
Continue holding the button until the alarm beeps several times
and the UPS performs a self-test. See “Results of a Self-Test”
below. Note: connected equipment may remain connected during
a self-test.
CAUTION! Do not unplug the UPS to test the battery. This will
remove safe electrical grounding and may introduce a
damaging surge into network connections.
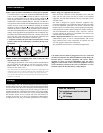
Results of a Self-Test: The test will last approximately 10 seconds
as the UPS switches to battery to test load capacity and charge. All
LCD Display icons will be illuminated and the UPS alarm will
sound.
•If the “FAULT” icon remains lit and the alarm continues to
sound after the test, the battery-supported outlets are overloaded.
To clear the overload, unplug some equipment from the
battery-supported outlets and run the self-test repeatedly until
the “FAULT” icon is no longer lit and the alarm is no longer
sounding.
CAUTION! Any overload that is not corrected by the user
immediately following a self-test may cause the UPS to shut
down and cease supplying output power in the event of a
blackout or brownout.
• If the “REPLACE” icon remains lit and the alarm continues to
sound after the test, the UPS batteries need to be recharged
or replaced. Allow the UPS to recharge continuously for 24
hours, and repeat the self-test. If the icon continues to
illuminate after repeated self tests, contact Tripp Lite for service.
Battery replacement should only be performed by
qualified service personnel. If the UPS requires battery
replacement, Tripp Lite offers a complete line of replacement
batteries at www.tripplite.com.
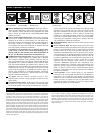
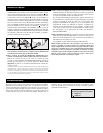
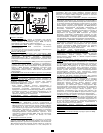
LCD Display
The LCD Display indicates a variety of UPS operational
conditions. All descriptions apply when the UPS is plugged into an
AC outlet and turned on. The LCD display may be rotated to match
the orientation of the UPS. Carefully insert a small tool in the slots
at the side of the LCD to remove it from the UPS housing, then
rotate the LCD and press it back into place.
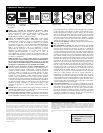
3-1) “INPUT VOLTAGE” Meter: This meter measures, in real
time, the AC voltage that the UPS system receives from the utility
wall outlet. Although the meter may occasionally display input
voltages which stray (due to poor quality utility service) outside
the range of standard computer tolerance, rest assured that the
UPS is designed to continuously supply connected equipment
with stable, computer-grade output through the use of automatic
voltage regulation. In the event of a blackout (power loss), severe
brownout (low power) or overvoltage (high power), the UPS will
rely on the internal battery to supply computer-grade output
voltage.
3-2) “BATTERY CAPACITY” Meter: This meter displays the
approximate charge level (in 20% increments) of the internal
battery. During a blackout or severe brownout, the UPS will
switch to battery power, the “ON BAT” icon will be illuminated
and the charge level will deplete.
3-3) “AVR” (Automatic Voltage Regulation) Icon: This icon
will illuminate whenever the UPS is automatically correcting low
AC line voltage without depleting battery power. This is a normal,
automatic operation of the UPS, and no action is required.
3-4) “REPLACE” (Battery Recharge/Replace) Icon: This icon
will illuminate and an alarm will sound after a self-test to indicate
the UPS battery needs to be recharged or replaced. Allow the UPS
to recharge continuously for 24 hours, and repeat the self-test. If the
icon continues to illuminate, contact Tripp Lite for service. Battery
replacement should only be performed by qualified service
personnel. If the UPS requires battery replacement, Tripp Lite
offers a complete line of replacement batteries at www.tripplite.com.
3-5) “ON BAT” (On Battery) Icon: During a severe brownout or
blackout, this icon illuminates and an alarm sounds (4 short beeps
followed by a pause) to indicate the UPS is operating from its
internal batteries. Monitor the “Battery Capacity” Meter to
determine the approximate battery charge level available to
support equipment. During a prolonged brownout or blackout, the
alarm will sound continuously (and the “BATTERY CAPACITY”
Meter will show one 20% capacity segment shaded) to indicate
the batteries are nearly out of power; save files and shut down
your equipment immediately.
3-6) “FAULT” Icon: This icon will illuminate and an alarm will
sound after a self-test to indicate the battery-supported outlets are
overloaded. To clear the overload, unplug some of the equipment
from the battery-supported outlets and run the self-test repeatedly
until the icon is no longer illuminated and the alarm is no longer
sounding.
CAUTION! Any overload that is not corrected by the user
immediately following a self-test may cause the UPS to shut
down and cease supplying output power in the event of a
blackout or brownout.
3-7) LCD Dimmer: Adjusts the brightness of the LCD Display.
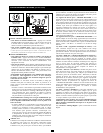
ON/OFF Button
MUTE/TEST Button
1
2
LCD Display
3
3-1
3-2
3-3
3-4
3-5
3-6
1
2
3
3-7