


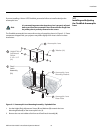


Operation
Vidikron Vision Model 15 Installation/Operation Manual 41
Color Space: Select Color Space from the Picture Adjust menu to choose the color space of
the source signal for HDMI, RGB and component connections.
• The default setting, Auto, functions as follows:
• HDMI/DVI-D: If the Auxiliary Video Information (AVI) infoframe contains color space
and/or range data, the Vision 15 uses that information. Otherwise, for RGB sources, the
Vision 15 uses the RGB-Video color space. For component SDTV and EDTV resolutions,
SDTV is used. For other component video resolutions, HDTV is used.
• DVI-A: If Hsync or Vsync signals are present, the Vision 15 uses the RGB-PC color space.
Otherwise, SDTV is used for SDTV and EDTV sources, and HDTV for all other sources.
• Component: For SDTV and EDTV resolutions, the Vision 15 uses the SDTV color space.
For all other resolutions HDTV is used.
In most cases, the Auto setting determines the correct color space to use. If it does not, you
can force the Vision 15 to use a specific color space. Choose one of the following:
• HDTV sets the color space matrix to that defined in ITU-R BT.709.
• SDTV sets the color space matrix to that defined in ITU-R BT.601.
• RGB-PC uses RGB color space and sets black at 0,0,0 RGB and white at 255,255,255 RGB,
assuming an 8-bit image.
• RGB-Video uses RGB color space and sets black at 16,16,16 RGB and white at 235,235,235,
assuming an 8-bit image, to correspond to the luminance values defined in digital
component standards.
BrilliantColor™: Select BrilliantColor™ from the Picture Adjust menu to enable (On) or
disable (Off) BrilliantColor processing, which improves brightness in grays and secondary
colors by using the spoke light from the color wheel.
Black Level: Select Black Level from the Picture Adjust menu to compensate for incoming
elevated black levels present in some Composite video and S-Video sources. (This control
does not affect other source types.) Set it to 0 IRE if blacks appear elevated (dark gray). If
blacks appear “crushed” (too dark), set it to 7 IRE.
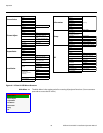
Save Settings: To store changes to picture quality settings for the current input and
resolution in the “Custom”
Picture Memory, select Save Settings from the Picture Adjust
menu. To recall this preset at a later time, press the CUST button on the remote control or
select “Custom” from the
Picture Memory menu (see above).
You should save changes to any of the following settings to a preset; otherwise they will be
lost when a new input source or resolution is selected:
• Aspect ratio (saved per source)
• Picture adjustments (brightness, contrast, color saturation, tint, sharpness, gamma, color
temperature, color space,
BrilliantColor™ and Black Level)
• RGB/YUV signal settings (H. Position, V. Position, Clock, Phase)
• Setup menu settings (Sync Threshold, DNR, Film Mode, Lamp Power)
• White Balance settings (gain and offset)
Reset to Defaults: To reset all picture quality settings for the current input and resolution to
their factory-default values, select
Reset to Defaults from the Picture Adjust menu.
To store changes to the ISF Night or ISF Day Picture Memory preset, select
Save Settings in the ISF menu (refer to ISF on page 50). You must enter a
passcode to access the ISF menu.
Note