


OPERATION NOTES
The 4X4 HDMI Matrix is housed in a metal box for better RF shielding.•
The 4X4 HDMI Matrix works with all DVI and HDMI displays.•
The 4X4 HDMI Matrix supports both AUDIO and VIDEO signals.•
The 4X4 HDMI Matrix is fully HDCP compliant.•
PLEASE READ THESE NOTES BEFORE INSTALLING OR
OPERATING THE HDMI4X4 MATRIX SWITCHER
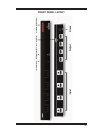
Connect all HDMI/DVI input sources to the HDMI input jacks on the 4X4
HDMI Matrix, using supplied cables (a DVI source may be connected using a
DVI-to-HDMI adapter cable, sold separately). Connect the HDMI/DVI displays
to the HDMI output jacks on the 4X4 HDMI Matrix. Connect the 24VDC power
tip to the 4X4 HDMI Matrix and plug the AC power cord to a free wall socket.
Beautiful, vibrant HD video and multichannel digital audio (if using HDMI) will
now be present at the HD display device.
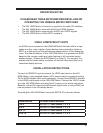
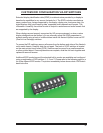
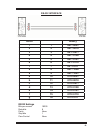
Controlling the 4X4 HDMI Matrix using the RMT16-IR is done as follows:
Press Buttons To Obtain Switch Behavior
1 to 4 OUTPUT 1: View Source 1, 2, 3, 4
5 to 8 OUTPUT 2: View Source 1, 2, 3, 4
9 to 12 OUTPUT 3: View Source 1, 2, 3, 4
13 to 16 OUTPUT 4: View Source 1, 2, 3, 4
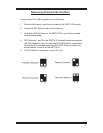
INSTALLATION INSTRUCTIONS
VIDEO COMPATIBILITY NOTE
An HDMI source connects to the HDMI4X4 Matrix Switcher with four input
cables and four output cables. Output devices are examined to obtain an
EDID, or a data record of the performance characteristics of the display de-
vices. The default behavior of this 4X4 HDMI Matrix is to generate an EDID
based on the common audio and video features of all connected output
display devices. (Please see EDID Mode 6 on Page 5). For example, the
display with the lowest native resolution will set the video resolution for all
connected display devices.
-3-