


DME-N Network Driver Installation Guide for LS9 5
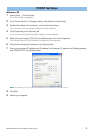
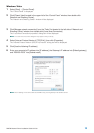
n When running under Windows Vista, the “User Account Control” dialog box may appear. Click [Continue].
n If an application that uses the DME-N Network Driver is running at this time the “Quit all applications that use the DME-N Network
Driver in order to change settings.” message will appear. The DME-N Network Driver settings cannot be changed while any
application that uses the DME-N Network Driver is running.
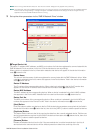
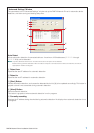
3 Set up the driver parameters via the “DME-N Network Driver” window.
1 Target Device List
The name, IP address, MAC address, and MIDI port number of all devices registered to communicate with the
DME-N Network Driver are shown in this list. Click the title bars to sort accordingly.
When a device is selected in the list, information related to that device will appear in the device information
area (2) below the list.
Device Name
This column lists the names of devices registered to communicate with the DME-N Network driver. When
a device is selected in the list it’s name also appears in the Device Name” field in the device information
area (2) below the list.
Device IP Address
The IP number of the corresponding device. When a device is selected in the list it’s IP number also
appears in the Device IP Number field in the device information area (2) below the list.
Device MAC Address
The MAC address of the corresponding device. When a device is selected in the list it’s MAC address
also appears in the Device MAC Address field in the device information area (2) below the list.
Device Port No.
The MIDI port number of the corresponding device. When a device is selected in the list it’s MIDI port
number also appears in the Device Port No. field in the device information area (2) below the list.
[New] Button
Click this button to add a new device to the list. Edit the device’s parameters as required via the fields in
the device information area (2) below the list, then click the [APPLY] button to add the specified device.
[Duplicate] Button
This button adds a device to the list by copying the data from the currently selected device. Edit the new
device’s parameters as required via the fields in the device information area (2) below the list, then click
the [APPLY] button to add the specified device.
[Remove] Button
Deletes the selected device from the list. If the removed device is not the lowest device in the list, all
devices below the removed device will be shifted upward to maintain the continuity of the list.
1
2
3