


22 Punch In/Out Recording
MT8XII—Owner’s Manual
4 Punch In/Out Recording
This chapter explains the MT8XII punch in/out recording techniques.
Punch In/Out
Punch in/out techniques allows you to rerecord specific sections of a track. This can be used to
correct mistakes or record something new into silent sections of a track. The MT8XII allows
you to perform punch in/outs manually or automatically. Manual punch in/out can be per-
formed using a footswitch, leaving your hands free. If you’re operating the MT8XII and playing
or singing the part to be recorded, you’ll find it much easier to use the Auto Punch In/Out func-
tion, which performs the punch in/out automatically. See Auto Punch In/Out on page 26 for
more information.
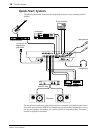
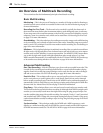
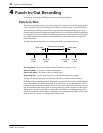
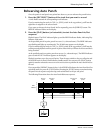
The following illustration shows the various points of the punch in/out process.
Pre-roll point—the point at which the Auto Punch In/Out sequence starts.
Punch-in point—the point at which recording starts.
Punch-out point—the point at which recording stops.
Post-roll point—a point approximately five seconds after the punch out point.
The pre-roll and post-roll points are used only with the Auto Punch In/Out function.
In the above illustration, the punch-in and punch-out points are shown in the middle of blank
areas. These blank areas indicate that punch in and punch out are not instantaneous. This is
because the erase head is located before the record–play head. About half a second (0.3 sec) of
tape is erased before the actual punch-in point and after the punch-out point. For this reason,
always chose a punch-in point that is at least half a second after any existing material, and a
punch-out point that is at least half a second before any existing material. Failure to do so may
result in the “tail” or “top” of existing material being erased.
Section to be recorded
Blank areaBlank area
Pre-roll
point
Post-roll
point
Punch-in
point
Punch-out
point