


30 Ping-Pong Recording
MT8XII—Owner’s Manual
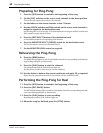
Preparing for Ping-Pong
1. Press the [RTZ] button to rewind to the beginning of the song.
2. Set the [FLIP] switches on the source track channels to the down position.
This sets the tape signal as the source for the channels.
3. Set the faders on the source channels to the 7–8 mark.
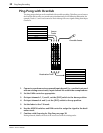
4. Use the ASSIGN switches and PAN controls on the source track channels to
assign the signals to the destination track.
See Recording the First Track on page 15 for information about using the ASSIGN switches and
PAN controls to assign signals to tracks.
5. Press the [REC SELECT] button of the destination track.
A circle flashes around the corresponding track indicator.
6. Press the MONITOR SELECT [GROUP] switch for the destination track.
This sets the monitor source to the destination track.
7. Set the MONITOR LEVEL control as required.
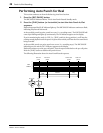
Rehearsing the Ping-Pong
8. Press the [REHE] button.
The REHE indicator lights up and the circle flashes around the corresponding track indicator
stops flashing and lights up continuously.
9. Press the [PLAY] button to start the rehearsal.
The rehearsal starts and the PLAY indicator lights up.
You should now be able to hear the source tracks combined.
10. Use the faders to balance the source track levels and apply EQ as required.
Repeat the ping-pong rehearsal until you are satisfied with the combined sound.
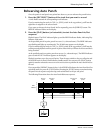
Performing the Ping-Pong for Real
11. Press the [RTZ] button to rewind to the beginning of the song.
12. Press the [REC/PAUSE] button.
The REC/PAUSE indicator lights up and the circle flashes around the corresponding track indi-
cator stops flashing and lights up continuously.
13. Press the [PLAY] button to start recording.
Recording starts and the PLAY indicator lights up.
14. When the song has finished, press the [STOP] button.