


Add Site Information 105
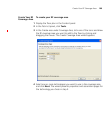
5 In the Starting Floor Level box, specify the floor number of the first floor
in the building. To start with a subterranean floor, you can specify 0 or a
negative floor number.
6 In the Skip Floor Levels box, specify floor numbers you want to skip.
Skipping floors is useful when you want to model only certain floors in a
building. To enter a list of floors, use commas to separate the floor
numbers (example: 1,3,7). To enter a range, use a hyphen (example:
8-12).
7 Click Finish to close the wizard.
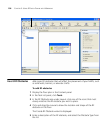
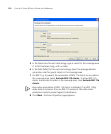
To add a floor to the building
1 In the Organizer panel, click the building name.
2 Select Create Floor in the Task List panel. The Create Floor wizard
prompts you for information about the new floor.
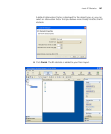
3 In the Floor Name box, type the name of the floor (1 to 60 alphanumeric
characters, with no spaces or tabs), and click Next.
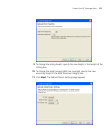
4 To change the default attenuation for radios, type the number of dB in
the 802.11a (dB) box or 802.11b/g (dB) box.
5 In the Height of the Ceiling box, type the number of feet or meters from
the floor to the ceiling (1 to 1000 feet or meters).
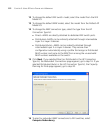
6 Click Finish to close the wizard.
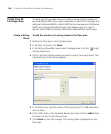
7 When you click on the floor’s name in the Organizer panel, a view of the
floor plan is displayed in the Content panel. Click on the ruler icon to set
the scale of your floor.