


Locating and Fixing Coverage Holes 189
Fixing a Coverage
Hole
After you import RF measurements, rebuild the attenuation library, and
display coverage, you can observe any wireless coverage holes in the
network. To fix a coverage hole, use either of the following methods:
Lock the MAPs in place, and use the Compute and Place task to
recompute the number of MAPs needed and their recommended
placement. If this results in new MAPs being added, install the new
MAPs.
Install new MAPs and add them to the network plan. Using this
method, you install the new MAP first, then integrate it into your
network plan.
Computing and
Placing New MAPs
The procedure for computing and placing new MAPs is the same as the
procedure you use for initial planning. (See “Compute and Place MAPs”
on page 142.) Using this procedure, you can determine the number and
location of additional MAPs you should add to your network.
Replanning Your
Network
After you have computed and placed new MAPs in the network plan, you
will need to add the MAPs to your network. For information about
adding MAPs to your network, see the Wireless LAN Switch and
Controller Hardware Installation Guide. This guide contains instructions
and specifications for installing an MAP access point and connecting it to
a WX switch.
After you install a new MAP in the network and you want to add it to the
network plan, do the following:
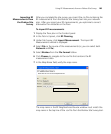
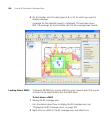
1 Select the RF Planning tool bar option.
2 In the Content panel, display the floor plan where the MAP is to be
installed.
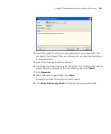
3 In the Organizer panel, click on Coverage Areas.
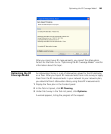
4 Right-click the Coverage Area to which the MAP is to be associated, and
select Edit Properties from the menu. The Coverage Area Properties
dialog for the selected coverage area appears.
5 Click the Associations tab to display area associations information for
the coverage area.
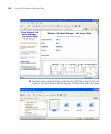
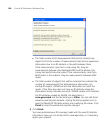
6 In the Available Access Points box, select one or more available MAPs to
use in the coverage area, then click Add to move the MAPs to the
Current Access Points box.
7 Click OK to close the dialog box.