


30 CHAPTER 2: INSTALLING AND CONNECTING A WX SWITCH
Installing a WX
Switch
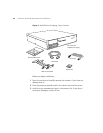
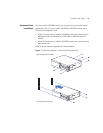
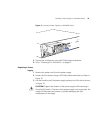
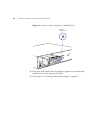
You can mount a WX1200, WX4400, or WX2200 switch in a standard
48.26-cm (19-inch) equipment rack or on a tabletop. Each switch is
shipped with two brackets for rack mounting and four adhesive rubber
feet for tabletop mounting. The WX4400 mounting brackets support
either front or center mounting. The WX1200 and WX2200 mounting
brackets support front mounting only.
The WXR100 switch does not have rack mounting brackets but can be
installed on a tabletop.
To install a WX switch, use one of the following procedures.
WARNING: Earth grounding is required for a WX switch installed in a
rack. If you are relying on the rack to provide ground, the rack itself must
be grounded with a ground strap to the earth ground. Metal screws
attaching the switch to the rack provide ground attachment to the rack.
WARNING: In the U.S., overcurrent protection must be provided by the
installation. Branch circuit protection in accordance with National Fire
Protection Association (NFPA) 70, National Electrical Code (NEC) is
required. Consideration must be given to the electrical ratings on the WX
switch and branch circuit protection. Do not install equipment such that
the branch circuit current and voltage protection is exceeded. Pay
particular attention to the earthing connection for the supply
connections. When using an extension cord or power strip, pay attention
to the grounding type.
CAUTION: Do not stack WXR100 switches. Stacked WXR100 switches can
overheat and cause loss of equipment functionality or permanent damage.
CAUTION: Ensure adequate airflow around WXR100 switches. The
WXR100 switch uses natural convection cooling and requires free entry
of air. Airflow blockage can cause the system to overheat and result in a
loss of equipment functionality or permanent damage.