17
4 Select the amount you want to increment the
character and press .
You can choose to increment in steps up to 10.
5 Select the number of times to increment and
press .
New labels are added in the display as needed to
complete the series.
To print multiple copies of the same serialized label, see
Printing Multiple Copies on page 18.
Using the Library
The library includes a set of default symbols and terms to
use on your labels. In addition, you can save your own
custom terms and frequently-used labels to the library.
Using Symbols
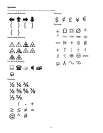
The printer includes a set of commonly used symbols to
include on your labels. The symbols are separated into
the following categories:
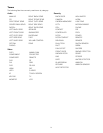
See Symbols on page 20 for a complete list of the
default symbols.
Some of the more popular symbols can be accessed
from the number keys using plus the number. For
example, pressing + 4 inserts an open bracket ( [ ).
Inserting Symbols
Symbols added to a label can be formatted or deleted
just like any other character you enter.
To insert a symbol
1 Press .
2 Select Symbols and press .
3 Select a category of symbols and press .
4 Select the desired symbol and press .
Using Terms
The printer includes a set of commonly used terms to
use on your labels. The terms are separated into the
following categories:
You can also save custom terms to the My terms
category of the library.
See Terms on page 21 for complete listings of
default terms.
Adding Terms to the Library
You can save up to 25 custom terms to the My terms
category of the library.
Barcode text cannot be saved as a term. You can
save text that appears either before or after the barcode,
but not both together.
To add a term to the library
1 Enter text to save to the library.
If your label contains a barcode, place the cursor
within the text you want to save.
2 Press + .
3 Select Term and press .
4 Select a location for the term and press .
The term is added to the My terms category of
the library.
Inserting Terms on Labels
Terms inserted on a label are the same as text entered
from the keypad. Terms can be edited, formatted,
or deleted.
To insert a term on a label
1 Press .
2 Select Terms and press .
3 Select a category of terms and press .
4 Select the desired term and press .
Deleting a Term from the Library
You can delete previously saved terms from the My terms
category of the library.
To delete a term from the library
1 Press .
2 Select Terms and press .
3 Select My terms and press .
4 Select the term to delete and press .
5 Press to delete the term.
Deleting a term or label from the library also deletes
that term or label from the Favorites list.
Using My Labels
Your printer includes a My Labels section of the library for
storing your frequently-used labels. You can quickly recall
saved labels to use at any time.
Saving Labels
You can save up to 25 frequently-used labels. When you
save a label, the label text and all formatting are saved.
To save a label
1 Press + .
2 Select Label and press .
3 Select a location for the label and press .
4 Enter a name for the label and press .
The label name can contain up to 20
alphanumeric characters.
You cannot save a group of labels to the library. If you
have multiple labels in the label edit screen, only the label
where the cursor is located will be saved.
Arrows/Brackets Numbers
Hazard /Warnings Currency
Pro AV/Security Electrical
Audio Security
Video My terms


