


Procedures
ATP-CNX-020 Rel. 1.2, Doc. Rev. 01.06 15
Aastra CNX Installation and Setup Procedures
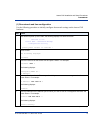
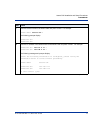
17 Enter up to four NTP servers in your network, and press <Enter>. For example:
NTP Server #1: [pool.ntp.org]: 192.167.2.11 ↵
NTP Server #2: [pool.ntp.org]: 192.167.2.12 ↵
NTP Server #3: [pool.ntp.org]: 0.0.0.0 ↵
NTP Server #4: [pool.ntp.org]: 0.0.0.0 ↵
Notes:
1. You can enter up to four NTP servers. If you have fewer than four NTP servers, enter the
IP address(es) for the NTP servers that you have, and then enter 0.0.0.0 for the remaining
NTP entries.
2. If you do not have your own NTP server, and the Aastra CNX has Internet connectivity,
you may use the default server entry of pool.ntp.org.
3. Aastra Telecom strongly recommends the use of NTP servers, either your own or the
default servers. NTP servers avoid clock slippage and inconsistent conference
start times on the Aastra CNX. However, you may completely disable the NTP
server feature by setting the IP address of all four servers to 0.0.0.0.
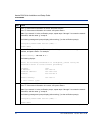
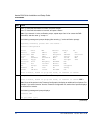
The following displays:
Before the following information is configured, please verify
the information below is correct before proceeding.
NTP Server #1 : 192.167.2.11
NTP Server #2 : 192.167.2.12
Is this information correct (y/n)[n]:
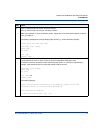
18 Enter “y” if the NTP information is correct, and press <Enter>.
Enter “n” if the NTP information is incorrect, and press <Enter>.
Note: If you entered “n” at the verification prompt, repeat step 17 to correct the NTP information, and
then enter “y” at step 18.
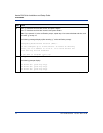
The following message displays (after entering “y” at the verification prompt):
The conference bridge has now been configured, the system will now reboot
to reflect the changes.
19 You have successfully initialized the Aastra CNX.
When you have completed initializing and configuring the Aastra CNX, go to Step 8, “Using the
Aastra CNX GUI via the Web” on page 16. For more information about logging in, see the Aastra
CNX System Administrator Guide.
Step Action