mikroC
- C Compiler for Microchip PIC microcontrollers
mikroC
making it simple...
26 0
MikroElektronika:
Development
tools
-
Books
-
Compilers
page
Library Example
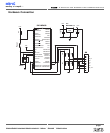
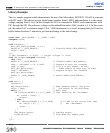
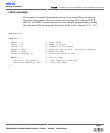
This is a sample program which demonstrates the use of the Microchip's MCP4921 12-bit D/A converter
with PIC mcu's. This device accepts digital input (number from 0..4095) and transforms it to the output
voltage, ranging from 0..Vref. In this example the D/A is connected to PORTC and communicates with
PIC through the SPI. The reference voltage on the mikroElektronika's DAC module is 5 V. In this exam-
ple, the entire DAC’s resolution range (12bit ? 4096 increments) is covered, meaning that you’ll need to
hold a button for about 7 minutes to get from mid-range to the end-of-range.
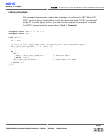
const char _CHIP_SELECT = 1, _TRUE = 0xFF;
unsigned value;
void InitMain() {
Soft_SPI_Config(&PORTB, 4,5,3);
TRISB &= ~(_CHIP_SELECT);
// ClearBit(TRISC,CHIP_SELECT);
TRISC = 0x03;
}
//~
// DAC increments (0..4095) --> output voltage (0..Vref)
void DAC_Output(unsigned valueDAC) {
char temp;
PORTB &= ~(_CHIP_SELECT);
// ClearBit(PORTC,CHIP_SELECT);
temp = (valueDAC >> 8) & 0x0F;
// Prepare hi-byte for transfer
temp |= 0x30;
// It's a 12-bit number, so only
Soft_Spi_Write(temp);
// lower nibble of high byte is used
temp = valueDAC;
// Prepare lo-byte for transfer
Soft_Spi_Write(temp);
PORTB |= _CHIP_SELECT;
// SetBit(PORTC,CHIP_SELECT);
}
//~
void main() {
InitMain();
DAC_Output(2048);
// When program starts, DAC gives
value = 2048;
// the output in the mid-range
while (1) {
// Main loop
if ((Button(&PORTC,0,1,1)==_TRUE)
// Test button on B0 (increment)
&& (value < 4095)) {
value++ ;
} else {
if ((Button(&PORTC,1,1,1)==_TRUE)
// If RB0 is not active then test
&& (value > 0)) {
// RB1 (decrement)
value-- ;
}
}
DAC_Output(value);
// Perform output
Delay_ms(100);
// Slow down key repeat pace
}
}
//~!


