


HARDWARE INSTALLATION
The switch can be placed directly on your desktop, or mounted in a rack.
Desktop Installation
Follow these steps to install the switch on a desktop:
1. Place the four rubber feet at the corners of the switch.
2. Place the switch on a clean, flat desktop.
3. Plug in all network connections and the power cord.
Rack-Mounting Installation
The switch may stand alone, or may be mounted in a standard size, 19-inch rack. Rack
mounting produces an orderly installation when you have a number of related network
devices. The switch is supplied with two mounting brackets and screws. These are
used for rack mounting the unit.
Follow these steps to install the switch on a rack:
1. Disconnect all cables from the switch before continuing.
2. Attach a mounting bracket to each side of the switch with the screws provided.
3. Slide the switch into the rack and use the screws provided to secure the switch to the
rack.
4. Connect the power cord and verify that if the switch is receiving adequate power.
5. Reconnect all cables.
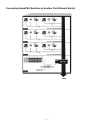
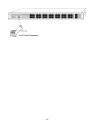
Network Connection
Connect PCs to the switch with telephone wires. Plug one end of the RJ-11 cable into
one of the 1Mbps switching HomePNA ports, and the other end into the PC’s network
adapter.
If you have two PCs linked together within the same 1Mbps home network, use another
telephone wire to link the two PCs to the wall jack through telephone wires.
- 5 -