


Appendix C: Using the ARC Utility ● 65
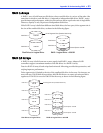
● When migrating from single volume to RAID 0, migrating from a larger drive to a
smaller drive is allowed. However, the destination drive must be at least half the
capacity of the source drive.
● It is not recommend that you migrate or build an array on Windows dynamic disks
(volumes), as it will result in data loss.
5 When you are finished, press Done.
Managing Arrays
Select the Manage Arrays option to perform these tasks:
● Rebuild Arrays
● View Array Properties
● Delete Arrays
● Enable/Disable Write Cache
● Verify Arrays
The following sections describe these operations in greater detail.
Rebuilding Arrays
Note:
Rebuilding applies to Fault Tolerant arrays (RAID 1) only.
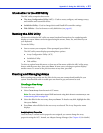
By replacing a failed drive of a RAID 1 array with a new drive, you can rebuild to get the array
to Optimal status and assume fault tolerance. You can perform a rebuild in the following ways:
Note:
If no spare exists and a hard disk drive fails, you need to create a spare before you
can rebuild an array. See Adding/Deleting Hotspares on page 66 before continuing your
rebuild.
● System Shutdown Rebuild
You can shut down the system and replace the failed drive with a new one (of equal or
greater capacity). When the system is booted, you can assign the new drive as a spare, and
this will start the Rebuild task. All the data from the good drive is copied to the new one,
and the original RAID 1 array is recreated.
● Manual Rebuild
a From the Main Menu, select Manage Arrays. From the List of Arrays, select the array
you want to rebuild.
b Press Ctrl+R to rebuild.
Viewing Array Properties
To view the properties of an existing array:
1 From the ACU menu, select Manage Arrays.
2 From the List of Arrays dialog box, select the array you want to view, then press Enter.
The Array Properties dialog box appears, showing detailed information on the array. The
physical disks associated with the array are displayed here.
3 Press Esc to return to the previous menu.