13
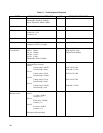
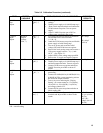
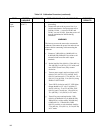
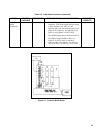
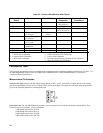
Table 2-2. Calibration Procedure (continued)
TEST TESTED
VARIABLE
TEST POINTS TEST SEQUENCE AND ADJUSTMENTS EXPECTED
RESULTS
V-MON
Zero
Adjust.
V-MON VM ( + )
M ( - )
a. Set voltage and current controls to minimum
settings.
b. Disable power supply as in Initial Setup step i.
c. Short circuit output terminals and connect the
DVM between test points. Turn on power
supply.
d. Adjust V-MON Zero trim pot A2R22 to
voltage range specified in the results.
0 ± 80µV
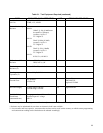
Common
Mode
Adjust.
Residual
Output
Voltage
VM( + )
VM ( + )
M ( - )
a. Set voltage and current controls to minimum
and short the unit's sense terminals
( + S & - S).
b. Attach the DVM across test points and disable
power supply as Initial Setup step i.
c. Turn on ac power and record the initial
voltage (IR) with DVM across test points.
d. Remove the local sensing straps and connect a
1Vdc power supply between - S( + ) and –
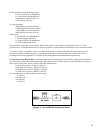
OUT( - ). See Figure 2-1.
e. Adjust A2R21 to the voltage range specified.
f. Remove the 1V supply and replace jumpers.
IR* ±80µV
IR* ±40µV
(6015A)
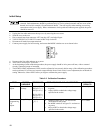
I-MON
Zero
Adjust.
I-MON IM ( + )
M (-)
a. Set voltage and current controls to minimum.
b. Disable power supply as in Initial Setup step I
and short output terminals. Turn on ac power.
c. Connect DVM across test points and adjust
I-MON Zero trim pot A2R8 as shown in
results.
0± 100µV
I-MON
F / S
Adjust.
I-MON IM ( + )
M ( - )
a. Perform I-MON Zero Adjust before
proceeding .
b. Connect a 0.010Ω (6010A), 0.0005Ω (6011A)
0.0001Ω (6012B), current monitoring resistor
Rm across the output terminals.
c. Turn on ac power and using the “Display
Setting”, set current control to 17A (6010A),
120A (6011A), 50A (6012B), 5A (6015A),
and voltage control to 5V.
d. Connect DVM across test points and take an
initial reading (IR).
IR*
Rm ( + )
Rm ( - )
e. Connect DVM across Rm monitoring
terminals and adjust A2R9 as shown in the
results.
0.034 IR*±
33.5µV (6010A,
6015A)
0.012 IR*
±40µV (6011A,
6012B)
*IR = Initial Reading


