


Getting Started with the Graphical User Interface (GUI) 25
Software Release 2.6.1
C613-02039-00 REV A
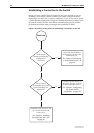
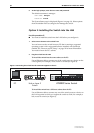
Option 1: Configuring the Switch before Installation
Use this procedure if:
■ You want to configure the switch before installing it in your LAN.
■ You will be installing the switch at a remote office or a customer site and
want to configure it first.
■ You want a dedicated management PC permanently connected to the
switch.
1. Select a PC to browse to the switch from
You can browse to the switch from any PC that is running a supported
operating system with a supported browser installed. See “Browser and
PC Setup” on page 22 for more information.
You need to know the PC’s subnet.
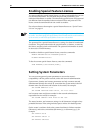
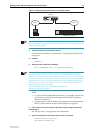
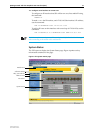
2. Connect the PC to the switch
Use a straight-through Ethernet cable to connect an Ethernet card on the
PC to any one of the switch ports (see Figure 3).
Figure 3: Connecting a PC directly to the switch.
You can browse to the switch through any VLAN, as long as you give that VLAN an IP
address (see below). These instructions assume you will use vlan1. The switch ports all
belong to vlan1 by default.
3. Access the switch’s command line interface
Access the CLI from the PC, as described in “Connecting a Terminal or PC”
on page 14.
4. Enable IP
ENABLE IP
5. Assign the vlan1 interface an IP address in the same subnet as the PC
ADD IP INTERFACE=vlan1 IP=ipaddress MASK=mask
6. Save the configuration and set the switch to use it on bootup
CREATE CONFIG=your-name.cfg
SET CONFIG=your-name.cfg
7. On the PC, bypass the HTTP proxy server, if necessary
See “HTTP Proxy Servers” on page 23 for more information.
8. Point your web browser at the LAN interface’s IP address