


Various Printing Operations
75
Printing on Back Print Film
This section explains the steps for printing illustrations and photographs on back print
film. Attaching printed back print film to paper with an iron gives the final image a glossy
finish like a photograph. Also, a finishing sheet that can be used to create a matte (non-
glossy) finish is included.
Note
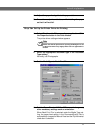
• Back print film printing is basically the same as normal color
printing. However, special sheets are used in place of paper.
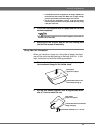
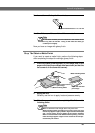
Hold the sheets by the edge when inserting them into the
printer to avoid touching the printing side.
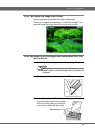
• Images printed on back print film should only be transferred
to white paper. Colored paper may affect the colors of the
printed image.
Requirements
For back print film printing you will need the following.
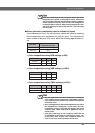
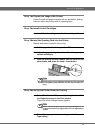
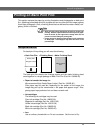
Printing side
Rougher surface
Insert in this direction
Silicon coated
side
• Back Print Film
• Finishing Sheet • Matte Finishing Sheet
The back print film sheets, the finishing sheets, and the matte finishing sheet
come together in a single package of Back Print Film (Part No. 106080-00).
• Paper to transfer the image to :
We recommend High Grade Paper (Letter) (Part No. 106085-00 ).
Plain paper may be used but, depending on the pattern of the image, the
image may pick up the unevenness in the paper and appear rough. Also,
glossy paper traps pockets of air and does not work well.
• Ink cartridges
The following ink cartridges may be used.
Cyan ink cartridge (Part No. 106020-00)
Magenta ink cartridge (Part No. 106015-00)
Yellow ink cartridge (Part No. 106010-00)
Black ink cartridge (Part No. 106005-00)
White ink cartridge (Part No. 106050-00)
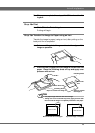
• Iron
Use an ordinary household iron. Do not use steam. Set the iron to Dry.