


36 Operation
Chapter 3 - Using the Web Configuration Server
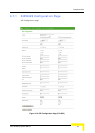
3.6.6.1 Method 1
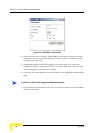
1 In the VLAN page, click Add VLAN to open the VLAN Editor.
2 In the VLAN Editor, enter the follwing for Voice and Management VLAN:
VLAN ID: 60
VLAN NAME: Voice&Mng
VLAN Priority: 6
WAN: Yes
LAN: No
3 Click OK to add the VLAN to the Tagged Port Membership table.
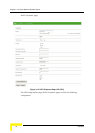
4 Enter the VLAN ID for Voice and Management (60) in the field Default VLAN
ID on WAN port, and click Save.
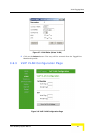
5 In the Page Selection bar, click on VoIP VLAN Configuration to open the VoIP
VLAN Configuration page. Enter 60 in the VLAN Tag fields for both Call
Signaling and RTP. Enter 6 in the Priority Tag field for both Call Signaling and
RTP. Click Save VoIP VLAN Settings. Go back to the VLAN Tagging page.
6 In the VLAN page, click Add VLAN to open the VLAN Editor.
7 In the VLAN Editor, enter the follwing for untagged data:
VLAN ID: 90 (an arbitrary selection-a VLAN ID is required for defining the
untagged data. This VLAN tag is only used internally in the unit)
VLAN NAME: Untagged
VLAN Priority: 0
WAN: Yes
LAN: Yes
8 Click OK to add the VLAN to the Tagged Port Membership table.
9 Enter the VLAN ID for untagged data (90) in the fields Untagged VLAN ID on
LAN port and Untagged VLAN ID on WAN port, and click Save.
10 Restart the unit to apply the changes.
3.6.6.2 Method 2
1 In the VLAN page, click Add VLAN to open the VLAN Editor.
2 In the VLAN Editor, enter the follwing for Voice and Management VLAN: