


4
STACKING THE UPS ON A BATTERY PACK
Note: For rack mounting, proceed to Mounting the UPS in a Rack, below.
Do not step on the UPS. The UPS chassis is not designed to sup-
port additional weight.
When stacking the UPS with an external battery pack, position the
UPS on top of the 2U battery pack. The top of the battery pack has
indentations for proper placement of the feet on the bottom of the
UPS.
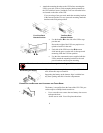
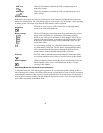
1. Unpack the four mounting feet shipped in the mounting kit.
2. Turn the UPS on its side so the bottom surface is accessible.
3. Locate the indentations on the bottom of the UPS that mark the
feet positions (indicated by arrows in the figure at left).
4. Peel away the protective film on the back of one foot, align the
adhesive side with an indentation on the UPS, and press hard to
affix the foot to the UPS. Repeat this step for all feet.
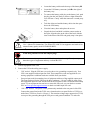
5. Turn the UPS right side up and place it either on the floor or on
an optional battery pack (shown). The battery pack cover has in-
dentations to accommodate the feet on the bottom of either a UPS
or another battery pack.
6. Continue with Connecting the Battery and Attaching the Bezel
(next page).
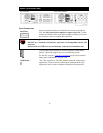
MOUNTING THE UPS IN A RACK
The UPS comes with standard 19-inch (46.5 cm) rack mounting rails, brackets, and cleats. The rack
can have any of the common types of equipment mounting holes (square, round-threaded, or round-
non-threaded). All necessary hardware is provided.
The UPS is heavy. To lighten it, you may remove the battery before mounting the unit in the rack.
See Chapter 5, Removing the Bezel and Battery Module. If you do not want to remove the battery,
continue with Mount the UPS in a Rack (below).
Mount the UPS in a Rack
1.
Install the mounting rails in the rack (required for four-post racks
only). Directions are included with the rail kit.
2. For a four-post rack, attach a mounting cleat to each side of the
UPS.