


5
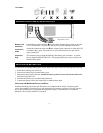
REMOVING THE BATTERY TRAYS FROM THE BATTERY PACK
The battery pack is heavy. To lighten it, remove the battery trays before mounting the unit in the
rack.
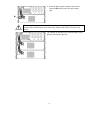
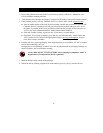
The battery trays are accessible from the front of the
battery pack (shown at left). This procedure requires
a Phillips screwdriver.
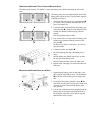
1. Notice that the two battery tray compartments
are visible. This procedure describes how to re-
move one battery tray.
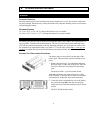
2. Locate the white cord attached to the battery tray
connector plug . Grasp the cord and pull firmly
toward you until the connector plug is discon-
nected.
DO NOT pull the battery cables.
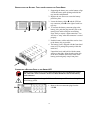
3. Use a screwdriver to remove the two battery pack
mount screws located at the top corners of the
face plate .
Set the screws aside in a safe place. You will re-
place them later.
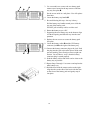
4. Locate the battery tray handle .
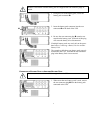
5. Be careful during this step—the battery tray is
heavy.
Pull the battery tray handle toward you to slide
the tray out of the battery pack.
DO NOT pull on battery cables or white cord.
6. Repeat Steps 2 through 5 to remove the other the
other tray.
M
OUNTING THE BATTERY PACK IN THE RACK
1. Supporting the battery pack on both sides, care-
fully align the unit with the rails. Use the handles
on the side of the battery pack to support the
unit.
2. Each side of the battery pack has a cleat that
must slide into the groove on the rails. Insert each
cleat into its groove and slide the battery pack
into position.
3. Use the four ornamental screws supplied with the
battery pack to attach the mounting brackets to
the rack post. Insert the screws into the top and
bottom holes in the U-space.