


6
REINSTALLING THE BATTERY TRAYS AND ATTACHING THE FRONT BEZEL
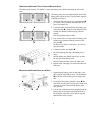
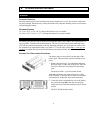
1. Supporting the battery tray on the bottom, align
it with the battery pack opening and slide the
tray into the compartment.
2. Replace the two screws to secure the battery
pack face plate.
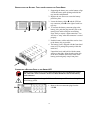
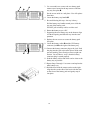
3. Locate the battery cables and the UPS bat-
tery connector jacks to the right of each bat-
tery tray.
4. To connect the battery connector plug to the
battery jack, push the plug into the jack so the
metal pieces inside each part are touching.
Press firmly to ensure a tight connection. You
will hear a “snap” when the connector is seated
properly.
5. Push the battery cables and white cord as close
to the battery tray as possible.
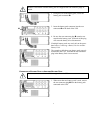
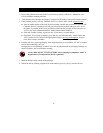
6. The battery pack is shipped with the front bezel
removed (it is packaged separately within the
main box).
Unpack the bezel and hold it with the cutout
section on the right. Align the tabs on the side
of the bezel with the slots on the front of the
battery pack and gently snap it into place.
C
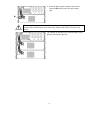
ONNECTING A BATTERY PACK TO THE SMART-UPS
Battery pack connectors are color-coded and keyed to prevent improper connec-
tion. The color of the connector on the UPS must match the color of the battery
pack connector.
Allow the battery pack to charge for 24 hours. Do not expect full run time during this
initial charge period.
1. Remove the rear connector plug from the
UPS .