


11
• Replace the quick disconnects on the indicator lamp socket.
• Reconnect the utility wires and the stinger lug.
• Close the front door of the enclosure.
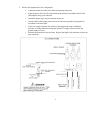
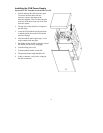
• Reinstall the FLM. Ensure the module is seated properly. Refer to Installing the FLM in
this manual.
• Switch the FLM and the utility circuit breakers ON.
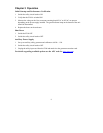
• Complete Performance Verification (refer to Initial Startup and Performance
Verification in this manual).
• Replace the top door of the enclosure.
• Indicator Lamp Replacement
• Gently pry the lens off the indicator lamp using the tip of a screwdriver.
NOTE: Place a hand over the lens as it is loosened to ensure that the lens is not lost
during the procedure.
• Remove the spent lamp and replace it with a new one.
• Snap the lens back into place.
• Euro Block Replacement
• Switch the utility circuit breaker OFF.
• Remove the doors to the enclosure.
• Remove the FLM.
• Disconnect (and tag), the wiring harness and utility wires from the Euro block.
• Remove the screws that secure the Euro block in the enclosure, and lift out the Euro
block.
• Insert the new Euro block and secure it in the enclosure.
• Reconnect the wiring harness to the Euro block.
• Reinstall the FLM.
• Replace the doors on the enclosure.
• Switch the utility circuit breaker ON.
• Complete Performance Verification (refer to Initial Startup and Performance
Verification in this manual).