


Establishing a Telnet Connection
Issue 1 September 2005 23
-
At the prompt, type set ip route <dest> <gateway> and replace <dest> and
<gateway> with the destination and gateway IP addresses.
Establishing a Telnet Connection
Perform the following steps to establish a Telnet connection to the P333T-PWR for configuration
of Stack or Router parameters. You can Telnet the Stack Master IP address:
1. Connect your station to the network.
2. Verify that you can communicate with the Avaya P333T-PWR by pinging the IP of the
Avaya P333T-PWR. If there is no response using ping, check the IP address and default
gateway of both the Avaya P333T-PWR and the station.
Tip:
Tip: The Avaya P333T-PWR default IP address is 149.49.32.134 and the default
subnet mask is 255.255.255.0.
3. From the Microsoft Windows taskbar of your PC click Start and then Run (or from the
DOS prompt of your PC), then start the Telnet session by typing: telnet
<P333R_IP_address>
For example: telnet 149.49.32.134
4. If the IP Address in the Telnet command is the IP address of the stack, then connection is
established with the Switch CLI entity of the Master module.
● The “Welcome to P333T-PWR screen appears
5. Enter the default name root at the Login name prompt.
6. Enter the User Level password root in lower case letters (do not use uppercase letters) at
the Password prompt.
● The User level prompt will appear when you have established communications with
the Avaya P333T-PWR
You can now configure the stack and change its IP address.
Configuring the Switch
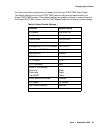
This section describes the procedures for the first-time configuration of the Avaya P333T-PWR
The factory defaults are set out in detail in the tables included in this chapter.
You may configure the Avaya P333T-PWR using the text-based Command Line Interface (CLI),
the built-in Device Manager or Avaya Integrated Management.