


User Manual version 2305
APOLLO 120/150 III
5-
57
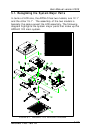
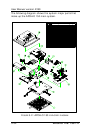
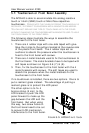
5.4. Motherboard Assembly
The motherboard is the first component to be assembled to
the system compartment. Follow the steps below to
assemble the motherboard to the system chassis. Make sure
the CPU with cooling fan and SDRAM are already properly
installed to the motherboard before the motherboard is
attached to the system chassis. (Refer to Sec. 5-2 and 5-3 for
CPU and SDRAM installation).
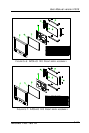
1. The lower side of the chassis has a rectangle opening at
the bottom of the chassis. Make the lower side of the
chassis to be near you.
2. From your point of view, the motherboard module is to be
installed to the lower side of the system compartment.
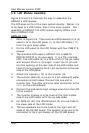
3. Tape the motherboard insulator (5) (Fig. 5-1 & 5-2 (5)) to
the motherboard (6) first. The insulator is to separate the
electronic components on the reverse side of the
motherboard from the metal compartment to prevent
short circuitry caused during system operation.
4. Fix the motherboard (6) to the chassis with 7 PMS
anti-fallen 3*6 screws.
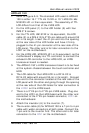
5. The IR/LED 2*13-pin cable (Fig. 5-7 (7) & Fig. 5-8 (5)) has
to go through the rectangle opening located at the bottom
side of the chassis, then connected to motherboard’s J9,
the HDD LED & ACPI LED & SMI connector.