


User Manual version 2305
APOLLO 120/150 III
5-
67
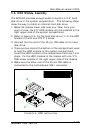
5.9. CD-ROM/DVD-ROM/FDD Module Assembly
The APOLLO provides enough space to accommodate a
CD-ROM or CD-RW or DVD-ROM and a floppy disk drive. The
CD-ROM or DVD-ROM drive used in the APOLLO 120/150 is
not the common 5.25” drive seen in computer stores. Rather,
it is a slim type drive widely used in notebook computers.
The APOLLO 120/150 can connect to an external floppy disk
drive or an internal slim type floppy disk drive, depending on
the system requirement.
Please note that either an external floppy disk drive or
internal floppy disk drive can be used.
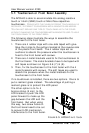
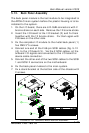
5.9.1. Internal CD-ROM/FDD Assembly
The following steps show the ways to install an internal
CD-ROM or DVD-ROM and floppy disk drive.
1. Make the chassis’ lower side near you. Now, from your
point of view, the CD-ROM/FDD module is to be installed
on the left side of the chassis.
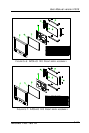
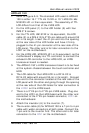
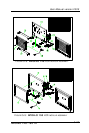
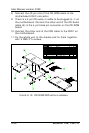
2. Refer to Figure 5-10. Attach the CD-ROM board (4) to the
slim CD-ROM (2) and fix them together with 2 screws.
PLEASE NOTE THAT THE 2 SCREWS NEED TO BE INCASED WITH 2
PLASTIC WASHERS (3) TO PREVENT SHORT CIRCUITRY.
3. Insert the CD-ROM module to the CD-ROM/FDD bracket
(9) and fix them together with 2 screws.
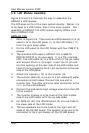
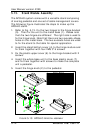
4. There is a 40-pin CD-ROM cable. Connect one end to the
CD-ROM board.
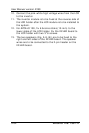
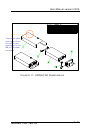
5. Attach one end of the 26-pin FDD flat cable (8) to the slim
floppy disk drive (7) first.
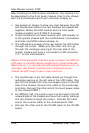
6. Insert the FDD module to the CD-ROM/FDD bracket and
fix them together with 2 FMS screws.
7. There is a small metal bracket (1) used to firmly fix the
CD-ROM and FDD modules to the CD-ROM/FDD bracket.
This small bracket is to prevent the CD-ROM/FDD from
moving when installed to the FDD/CD-ROM bracket.