


Starting Up Your Server 65
Erasing Your Hard Disk
This procedure completely erases the contents of your hard disk before restoring the original
contents (original system software, factory settings, and applications that came with your
computer).
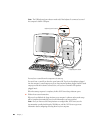
1 Start up your computer from the software restore CD.
Hold down the C key on your keyboard while you choose Logout from the File menu, then
choose Restart (make sure the Caps Lock key is not engaged). When you see the screen that
says “Starting Up,” release the C key. The CD icon appears at the top-right corner of the
desktop. Double-click the CD icon.
2 Open the Apple Software Restore application.
3 Click the OK button on the introductory screen.
4 If necessary, click Switch Disk to choose the disk on which you want to restore your
software.
5 Click the checkbox next to “Erase your hard disk before restoring.”
6 If necessary, choose the disk format you want from the Volume Format pop-up menu.
The recommended option is “Same as selected configuration” because it restores your hard
disk to the Mac OS Extended format. This format provides more efficient storage, especially
on large disks.
7 Click Restore.
8 Click OK.
9 An onscreen message shows the status of the erase and restore process.
10 Click Quit when the process is complete.