


ASUS P4S8X motherboard user guide
85
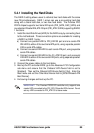
5.4.1 Installing the Hard Disks
The RAID 0 setting allows users to reformat two hard disks with the same
new OS simultaneously. RAID 1 arrays can use a pre-existing hard disk
along with a blank hard disk, or two new hard disks. The Promise PDC
20376 chipset supports two Serial ATA ports (PRI_SATA, SEC_SATA) and
one standard Parallel IDE, ATA133 port (PRI_ATA133 IDE) supporting RAID0/
1 functions.
1. Install the Hard Disk Drives (HDD) for the RAID array by connecting them
to the motherboard. Three connection options are available for creating
a RAID 0 or RAID 1 array:
a) Connect one parallel HDD to PRI_ATA133 port and one serial ATA
IDE HDD to either of the two Serial ATA ports, using separate parallel
ATA or serial ATA cables.
b) Connect one serial ATA HDD to each serial ATA port, using separate
serial ATA cables.
c) Connect one serial ATA HDD to the Pri_ATA133 port, and one serial
ATA HDD to either of the two serial ATA ports, using separate parallel/
serial ATA cables.
2. Connect the power cables to the hard disks.
3. Boot up the PC and enter BIOS: go to the Advanced: PCI Configuration
sub-menu and ensure that the Onboard ATA Device field is set to
[Enabled]. Then set the Onboard ATA Device field to [Yes]. Enter the
Boot menu and set the Other Boot Device field to [SCSI/Onboard ATA
Boot Device].
4. Exit saving changes and boot-up the PC.
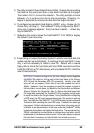
IMPORTANT! The Promise PDC20376 controller only supports one
master HDD connected to the PRI_ATA133 parallel IDE channel. Do not
set any HDD connected to PRI_ATA133 to slave mode.